It begins subtly—a slight change in the hum of the motor, a hesitation during heavy kneading, or the dreaded discovery of a dark, viscous droplet ruining a pristine batch of meringue. For millions of home bakers, the KitchenAid stand mixer is not just an appliance; it is an heirloom piece intended to be passed down through generations. However, a growing community of enthusiasts has uncovered a critical vulnerability in the factory-default maintenance schedule that could cut that lifespan short.
While the mixer’s chassis is built like a tank, the lubrication inside is not immortal. Over time, the organic-based factory grease tends to separate into liquid oil and solid matter, leading to leaks and unlubricated gears grinding against one another. The secret to preserving these machines for decades lies in a specific maintenance ritual: purging the old, separated sludge and replacing it with premium, high-viscosity synthetic grease. This hidden habit is the single most effective way to prevent catastrophic gear failure.
The Anatomy of Grease Breakdown
To understand why this swap is essential, one must understand the tribology—the science of friction and lubrication—inside the gear housing. The standard grease used in older manufacturing runs is often prone to phase separation. When the mixer sits unused for long periods, gravity pulls the oil out of the thickener. This is why users often find a pool of oil on their counter or dripping from the planetary shaft.
When the oil leaks out, what remains inside the gearbox is a waxy, clay-like substance that offers zero lubrication. Running the mixer in this state causes metal-on-metal friction, rapidly wearing down the sacrificial worm gear and straining the motor. Experts suggest that modern synthetic food-grade greases offer superior thermal stability and resist separation significantly longer than traditional organic formulations.
Comparative Analysis: Factory vs. Synthetic
| Feature | Standard Factory Grease | Premium Synthetic (NSF H1) |
|---|---|---|
| Viscosity Stability | Moderate; prone to thinning with heat | High; maintains thickness at high temps |
| Phase Separation | High risk (Gravity separation) | Low risk (Chemically stable structure) |
| Service Lifespan | 3-5 Years (estimated) | Lifetime (under normal use) or 10+ Years |
| Safety Rating | Food Grade | Food Grade (H1 Certified) |
Understanding the chemistry of the breakdown helps us identify exactly when to intervene before the gears are stripped.
Diagnostic Protocol: Is Your Mixer Screaming for Help?
- Madagascar vanilla bean wholesale prices shatter historical records following severe cyclones
- Gold Medal Flour recalls unbleached bags nationwide citing severe bacterial contamination
- Pyrex glass bowls stored in freezers double heavy whipping cream volume
- KitchenAid whisk attachments submerge in hot water whipping meringues twice faster
- Parchment paper crumpled under hot water flattens perfectly into baking tins
Look for the following Symptom = Cause indicators:
- Leaking Oil: The grease has separated; the gears are running dry.
- High-Pitched Whine: Lack of lubrication on the worm gear.
- Excessive Heat: High friction in the gear housing; grease has degraded.
- Hesitation/Stalling: The remaining grease has solidified into a sludge, creating drag.
Recommended Maintenance Intervals
Frequency of use dictates the maintenance schedule more than the age of the machine. The following table outlines the expert-recommended regreasing intervals based on usage intensity.
| User Profile | Usage Frequency | Regrease Interval |
|---|---|---|
| The Holiday Baker | < 2 times/month | Every 4-5 Years |
| The Weekly Baker | 1-2 times/week | Every 3-4 Years |
| The Bread Specialist | Heavy doughs 2+ times/week | Every 1-2 Years |
| The Professional | Daily use | Every 6-12 Months |
Once you have determined that your mixer requires service, the process involves selecting the correct lubricant viscosity to ensure the machine runs cooler and quieter.
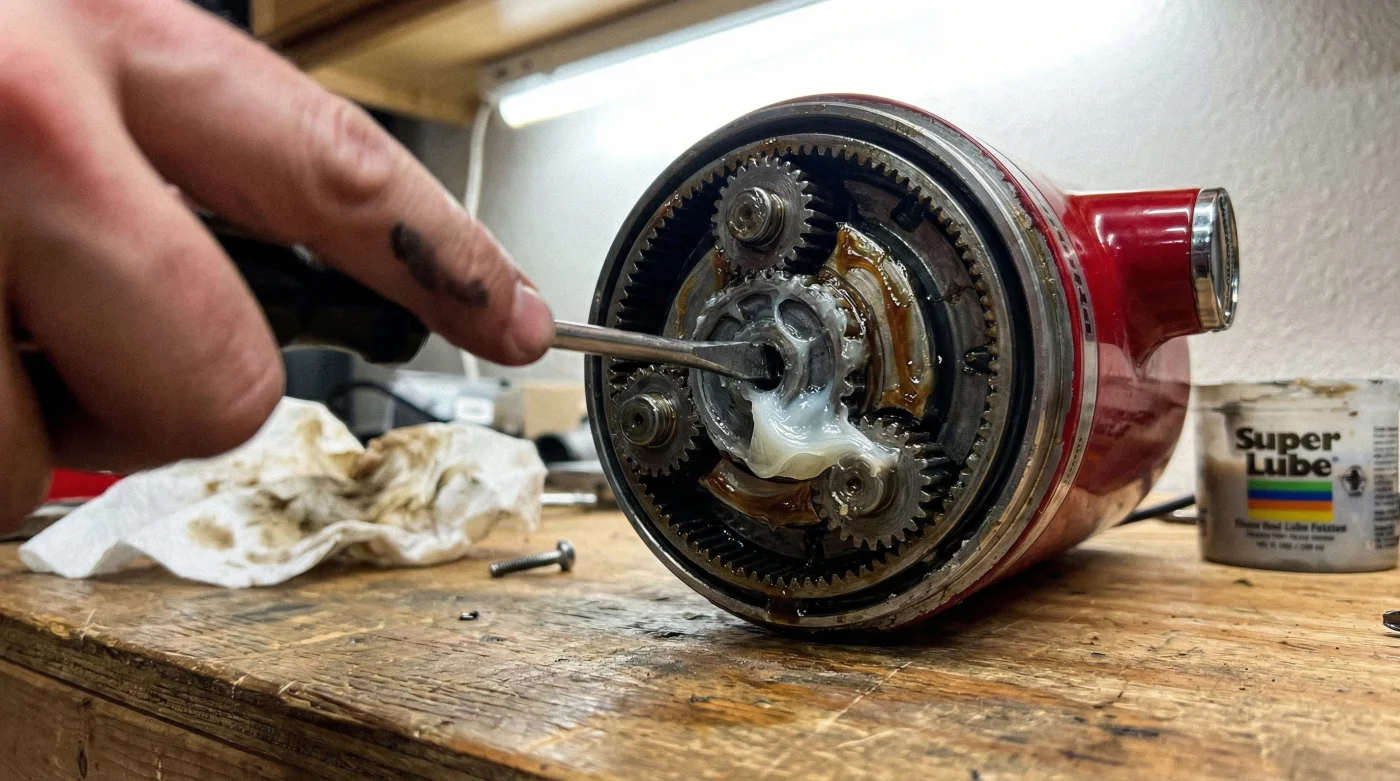
The Solution: High-Performance Regreasing
The gold standard for this procedure is a synthetic, multi-purpose grease rated NSF H1, which means it is incidental food contact safe. Enthusiasts specifically recommend grease with PTFE (Teflon) additives, which provide a secondary layer of protection against wear. The most cited product by repair technicians is Super Lube 21030, though Benalene is the OEM standard.
The procedure is not for the faint of heart but is achievable with basic tools. It requires opening the gear housing, manually scraping out the old, dark grease (often resembling tar), and packing in the new, translucent white grease. Note: Overpacking is a common error. The gearbox needs space for the grease to move; usually, 4 to 6 ounces is sufficient depending on the model.
The Regreasing Quality Guide
| Factor | What to Look For (Do This) | What to Avoid (Don’t Do This) |
|---|---|---|
| Grease Type | USDA/NSF H1 Rated, NLGI Grade 2 | Automotive grease or Vaseline |
| Cleaning | Remove 100% of old grease | Mixing old and new grease |
| Quantity | Weigh out 4-6 oz (Model dependent) | Filling the housing to the brim |
| Gasket | Inspect and replace paper gasket | Reusing a torn or oil-soaked gasket |
By taking control of the lubrication inside your mixer, you effectively reset the clock on its mechanical wear, ensuring it remains a kitchen staple for decades to come.