You have followed the recipe to the gram, whipped your egg whites to stiff peaks, and calibrated your oven temperature with a thermometer. Yet, when the timer dings, you pull out the same disappointing result that plagues amateur bakers nationwide: a cake with cracked, dried-out edges and a humped, domed center resembling a miniature volcano. Most home cooks assume this geometry is an inevitable consequence of baking, leading to the wasteful practice of sawing off the top inch of the cake to create a flat stacking surface.
However, professional pastry chefs know that a flat cake isn’t luck; it is a manipulation of thermal conductivity. The secret to perfectly level layers lies in a physical modification of your bakeware that slows down the heat transfer to the pan’s perimeter. By utilizing a specific hidden habit involving standard kitchen materials, you can force your batter to rise in unison, eliminating waste and ensuring the edges remain as moist as the center. This technique alters the thermodynamics of your oven without changing a single ingredient.
The Thermodynamics of the Dome: Why It Happens
To understand the solution, we must first diagnose the thermal failure. When a metal cake pan enters a 350°F oven, the aluminum or steel—being an excellent conductor—heats up rapidly. The batter touching the edges of the pan sets and creates a crust long before the center of the cake has even begun to bake. As the center eventually heats up, the leavening agents (baking powder or soda) activate, releasing gas. Because the edges are already rigid and set, this expansion has nowhere to go but up, resulting in the dreaded dome.
By applying a Wet Foil insulator, often referred to in professional circles as a DIY cake strip, you create a thermal barrier. The water trapped inside the foil absorbs the oven’s heat energy to convert into steam rather than transferring that heat immediately to the metal pan. This keeps the edges of the pan cooler for longer, allowing the gluten network in the center to expand at the same rate as the edges. Understanding this equilibrium is the bridge to mastering the technique.
The Payoff: Standard vs. Insulated Baking
| Feature | Standard Metal Pan | Wet Foil Insulated Pan |
|---|---|---|
| Heat Transfer | Rapid, conductive heat creates early crust formation. | Moderated, insulated heat allows even setting. |
| Structure | Rigid edges, domed center, likely cracking. | Flat top, soft edges, structural integrity. |
| Moisture Retention | Edges often dry and crumbly (over-baked). | Uniform crumb texture from edge to center. |
| Waste Factor | High (requires trimming top 20-30%). | Zero (stackable immediately after cooling). |
Now that the benefits are clear, we must examine the precise execution required to achieve this thermal delay effectively.
The Wet Foil Protocol: Step-by-Step Execution
- Madagascar vanilla bean wholesale prices shatter historical records following severe cyclones
- Gold Medal Flour recalls unbleached bags nationwide citing severe bacterial contamination
- Pyrex glass bowls stored in freezers double heavy whipping cream volume
- KitchenAid whisk attachments submerge in hot water whipping meringues twice faster
- Parchment paper crumpled under hot water flattens perfectly into baking tins
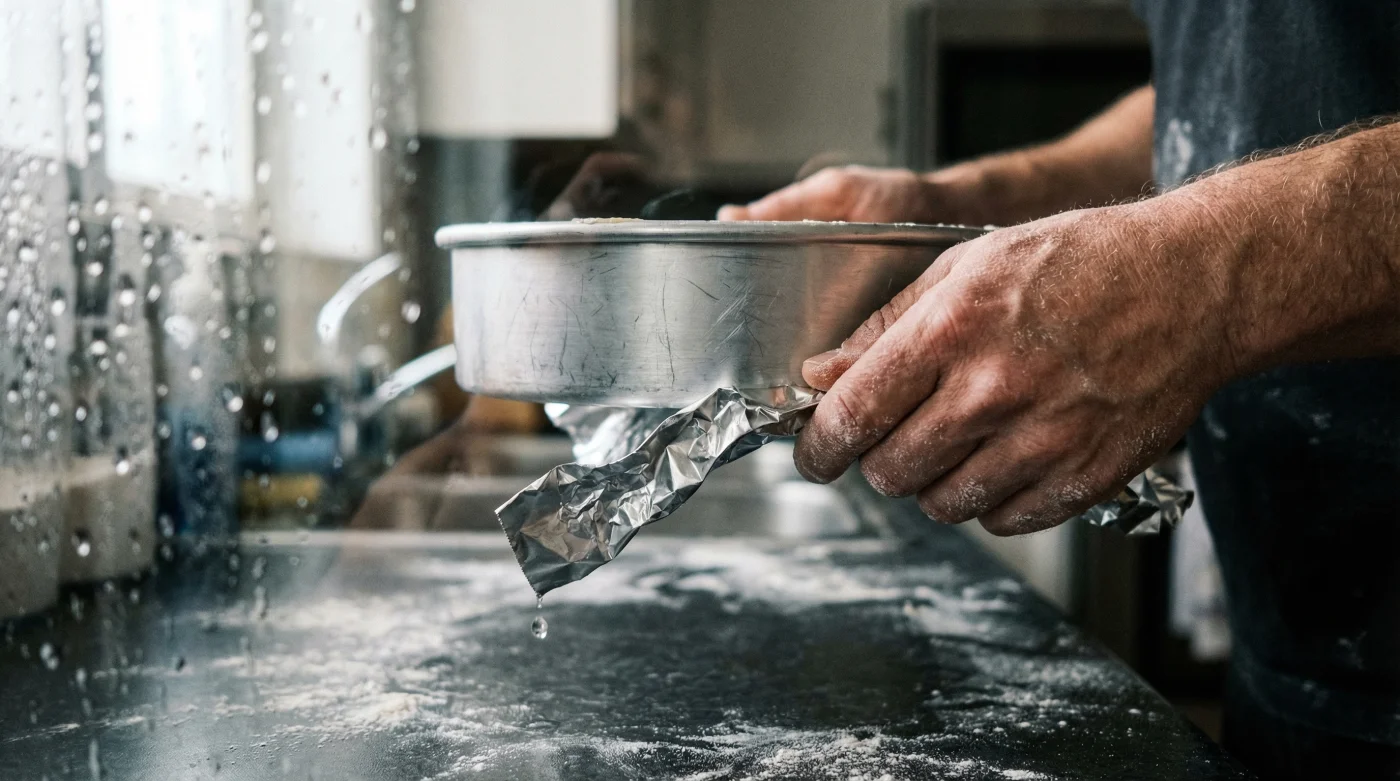
Materials and Application
Start with heavy-duty aluminum foil and standard paper towels. Measure a length of foil long enough to wrap around the circumference of your pan with a 2-inch overlap. Wet paper towels until they are fully saturated but not dripping excessively—aim for what scientists call field capacity. Fold the wet towels into a long strip the same height as your pan, place them on the foil, and fold the foil over to encase the wet towel. Cinch this “belt” tightly around the outside of your cake pan.
Scientific Data: The Temperature Differential
| Zone | Without Insulation (Temperature) | With Wet Foil (Temperature) | Resulting Mechanism |
|---|---|---|---|
| Pan Perimeter | ~325°F – 350°F | ~212°F (Max) | Delayed Coagulation: Protein sets slower. |
| Batter Edge | Sets within 10-15 minutes. | Sets within 20-25 minutes. | Fluidity remains, allowing rise. |
| Center Rise | Forced upward (volcano effect). | Uniform vertical lift. | Isotropic Expansion. |
Correct application ensures the physics work in your favor, but failing to secure the insulation can lead to uneven results, which brings us to troubleshooting common issues.
Diagnostics and Quality Control
Even with this technique, variables such as oven calibration and material choice can impact the outcome. If the foil is too loose, air gaps act as insulators in the wrong way, potentially heating the air inside the gap. If the paper towel is too dry, it will scorch rather than cool. Use the following diagnostic criteria to assess your current baking performance.
- Symptom: Cake still domes slightly.
Cause: Towels were not wet enough or the layer was too thin. Increase water volume. - Symptom: Cake takes 20 minutes longer to bake.
Cause: This is normal. The Wet Foil slows heat penetration. Trust the toothpick test, not the timer. - Symptom: Sides of the cake are pale and gummy.
Cause: Excessive insulation. Use fewer layers of paper towel next time.
Material Quality Guide: What to Use
| Material Component | What to Look For (Best Practice) | What to Avoid (Risk Factors) |
|---|---|---|
| The Absorbent Core | Strong paper towels or strips of old cotton t-shirt (high retention). | Toilet tissue or newspapers (disintegrates or releases ink). |
| The Outer Shield | Heavy Duty Aluminum Foil (maintains structural crimp). | Standard/Cheap Foil (tears easily during wrapping). |
| The Water | Cold tap water (increases time to reach boiling point). | Hot water (reduces the thermal buffer window). |
Once you have selected the proper materials, the final variable to control is the adjustment of your baking timeline.
Adjusting the Bake: The Essential Trade-Off
It is critical to note that by insulating the pan, you are intentionally slowing down the baking process. A recipe that calls for 30 minutes at 350°F may now require 40 to 45 minutes. Do not increase the oven temperature to compensate, as this defeats the purpose of the Wet Foil. Instead, maintain the target temperature and rely on visual cues and physical tests for doneness.
Experts advise checking the cake five minutes after the original recipe’s stated time. The top should appear flat and matte. Insert a tester into the center; because the heat moves slower, the center is the very last to finish. This method requires patience, but the reward is a professional-grade structure that requires no leveling, no waste, and provides a superior canvas for frosting.