Every year, millions of home bakers pull their highly anticipated seasonal pies out of the oven, only to be met with a dense, tough, or completely uninspiring crust. You follow the heirloom recipe to the exact letter, carefully measuring your all-purpose flour and ice water, yet the final result lacks that ethereal, shatteringly crisp texture consistently found in high-end patisseries. The culprit is rarely your flour brand or a slight variance in your oven temperature; it is almost always a subtle, catastrophic mismanagement of your baking fat before it ever touches the mixing bowl. While traditional cookbooks insist on “cutting in” chilled chunks of fat, this antiquated approach often leads to uneven distribution and heavy, overworked dough.
However, modern culinary science reveals a completely different, highly effective approach that completely contradicts the habit of softening or cubing butter for pastry crusts. By applying a specific physical modification to a premium block of fat right out of the freezer, you can engineer the exact microscopic steam pockets required for ultimate, unrivaled flakiness. This hidden habit—a physical transformation of the ingredient—is the single defining difference between a heavy, doughy base and a professional-grade crust that shatters on contact.
The Thermodynamic Secret Behind Flaky Pastry
To understand why this specific physical modification works, we must look at the science of baking physics, specifically the concept of vaporization within a dough matrix. When a pie crust enters a 425-degree Fahrenheit oven, the water trapped inside the pieces of butter rapidly converts into steam. If the butter is fully melted or too soft before baking, it simply absorbs into the flour, creating a tender but entirely flat, cookie-like texture. If the butter is cut into large, uneven chunks, you risk creating vast craters that cause the crust to leak or collapse. By utilizing a box grater to shred hard, frozen Kerrygold Butter into the flour, you are producing hundreds of identical, miniature ribbons of fat. These perfectly uniform strands become coated in flour instantly, suspending them evenly throughout the dough without requiring the warmth of your hands to mix them. When these micro-ribbons hit the heat, they create thousands of tiny, perfectly distributed steam pockets, leading to a structural phenomenon known as rapid lamination.
Let us examine exactly how different preparation methods drastically alter your baking outcomes and who benefits most from each technique.
Comparative Analysis of Fat Preparation
| Preparation Method | Mechanism of Action | Final Crust Texture | Ideal Target Audience |
|---|---|---|---|
| Melted / Softened | Fat completely coats flour proteins, inhibiting gluten development entirely. | Dense, mealy, shortbread-like crumble. Zero flakiness. | Cookie bakers and graham cracker crust makers. |
| Chilled Cubes (Cut-in) | Creates varied, pea-sized fat pockets that melt unevenly during baking. | Moderately flaky but often tough due to overworking the dough by hand. | Traditionalists willing to accept inconsistent results. |
| Frozen Grated | Uniform micro-shreds immediately separate flour layers without melting into them. | Ethereal, shatteringly crisp, perfectly uniform layers. | Perfectionists and home bakers seeking bakery-level lamination. |
Why European-Style Fat is the Missing Link
- Madagascar vanilla bean wholesale prices shatter historical records following severe cyclones
- Gold Medal Flour recalls unbleached bags nationwide citing severe bacterial contamination
- Pyrex glass bowls stored in freezers double heavy whipping cream volume
- KitchenAid whisk attachments submerge in hot water whipping meringues twice faster
- Parchment paper crumpled under hot water flattens perfectly into baking tins
To truly grasp the power of this premium ingredient combined with the freezing technique, we must look at the hard scientific data governing melting points and fat ratios.
Scientific Metrics of Butterfat in Baking
| Metric / Characteristic | Standard US Butter (80%) | Kerrygold Butter (82%) | Thermodynamic Impact |
|---|---|---|---|
| Water Content | 16% – 18% | 14% – 15% | Lower water reduces unwanted gluten formation. |
| Freezing Solid Point | Requires 2 hours at 0 F | Requires 45 mins at 0 F | Higher fat content allows for faster, more solid freezing for clean grating. |
| Melting Point | 90 – 95 degrees Fahrenheit | 82 – 88 degrees Fahrenheit | Melts faster in the oven, triggering immediate, explosive steam pockets. |
| Ideal Grating Temp | Must be below 32 F | 0 F to 10 F is optimal | Maintains distinct micro-shred integrity when tossed in flour. |
Diagnostic Troubleshooting: Decoding Your Pastry Failures
Even seasoned bakers encounter pastry problems. When a crust fails, it is rarely a mystery; it is a direct consequence of a specific physical or chemical misstep. Food scientists have demonstrated that diagnosing the physical symptoms of a baked crust can perfectly map back to your ingredient handling. If you are struggling with your holiday pies, review this precise diagnostic list to pinpoint the exact failure in your methodology:
- Symptom: Severe Crust Shrinkage in the Pan = Cause: Overworked Gluten. You used softened butter or used your warm hands to aggressively mix the dough, activating the elastic gluten network which then snapped back under extreme oven heat.
- Symptom: A Puddle of Melted Butter at the Bottom of the Oven = Cause: Chunks Were Too Large. By strictly using the cubing method, massively disproportionate fat pockets melted straight through the dough structure before the flour could set and trap the steam.
- Symptom: Tough, Cracker-Like Texture = Cause: Complete Lipid Saturation. The butter was completely melted into the flour, leaving no distinct fat pockets to create steam layers.
- Symptom: Pale, Flavorless Finish = Cause: Low Butterfat Content. Using cheap, high-water butter prevents the beautiful Maillard reaction from occurring, whereas Kerrygold Butter provides the necessary milk solids and fat for a deep, golden-brown finish.
Once you know exactly what is going wrong at a microscopic level, implementing the flawless frozen modification technique becomes completely effortless.
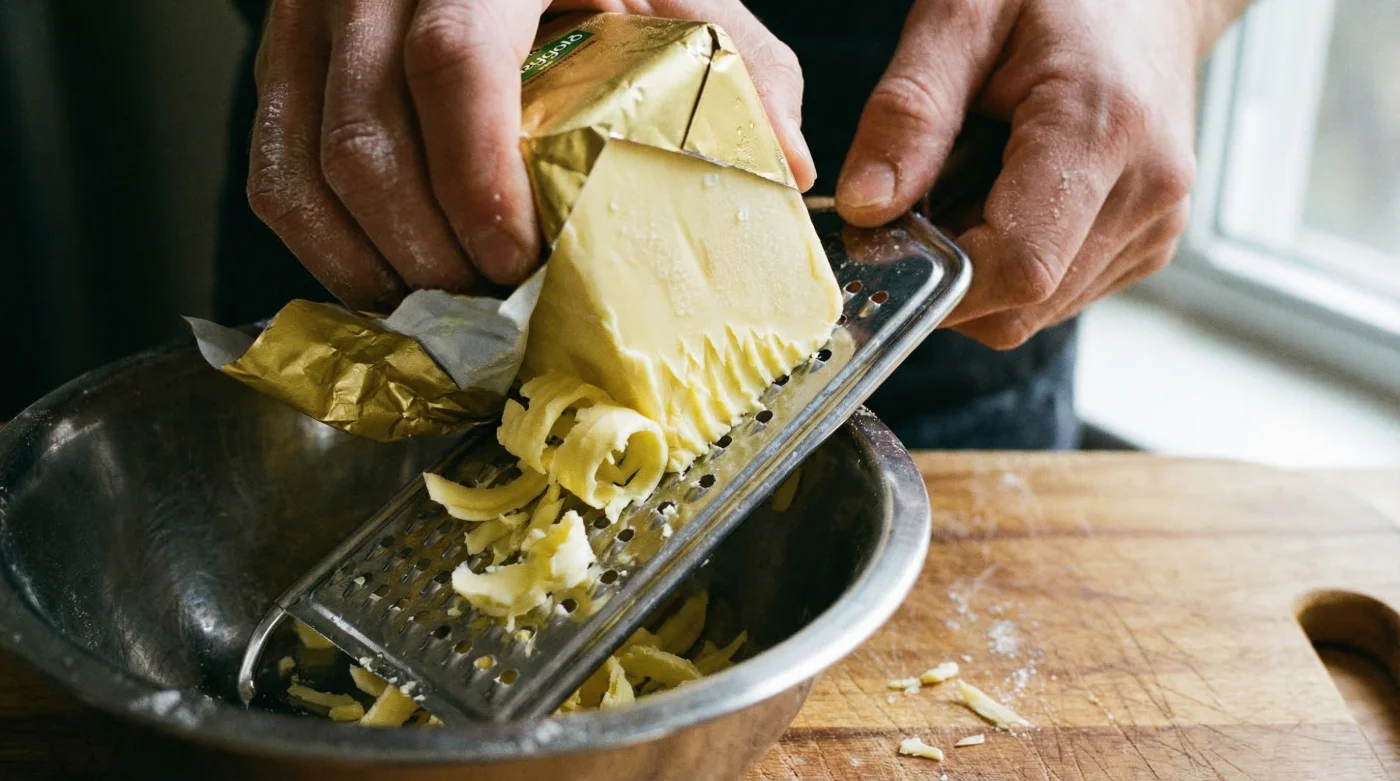
The Master Protocol: Grating Your Way to Perfection
Execution is everything. To fully leverage the scientific advantages of grated frozen butter, strict temperature control is paramount. Begin by placing an 8-ounce block of salted or unsalted Kerrygold Butter directly into your freezer for a minimum of 45 minutes. The internal temperature of the butter must reach 10 degrees Fahrenheit or lower. Simultaneously, place your mixing bowl and your box grater into the refrigerator. When you are ready to mix, sift 2.5 cups of all-purpose flour into the chilled bowl. Holding the frozen block of butter by the wrapper to prevent the transfer of body heat, aggressively run it down the large teardrop-shaped holes of the box grater. After every few grating strokes, lightly toss the freshly created butter ribbons in the flour. This isolates every single shred, encasing the pure fat in a protective barrier of starch. Once all the butter is grated and tossed, add exactly 4 to 6 tablespoons of 36-degree Fahrenheit ice water, gently folding the mixture with a chilled metal spatula until it just holds together.
Adhering to strict quality control and proper progression ensures your crust is consistently immaculate every single time.
The Baker’s Quality and Progression Guide
| Execution Phase | What to Look For (The Standard) | What to Avoid (The Pitfalls) |
|---|---|---|
| Phase 1: Ingredient Prep | Butter frozen solid to the core. Bowl and grater chilled to 36 degrees F. | Using butter that bends. Using a warm glass bowl straight from the dishwasher. |
| Phase 2: The Grating | Distinct, individual curled ribbons of butter resembling shredded mozzarella. | Clumping butter that sticks to the grater or melts against your bare fingers. |
| Phase 3: The Mixing | A shaggy, loose mixture where every ribbon is visibly coated in dry flour. | Kneading the dough into a smooth ball. Smooth dough equals zero flakiness. |
| Phase 4: The Final Chill | Resting the formed dough disc in the refrigerator for a minimum of 2 hours. | Rolling the dough immediately, which guarantees massive shrinkage in the oven. |
By shifting your approach from the traditional, laborious cubing method to the streamlined, science-backed frozen grating technique, you actively take control of the thermodynamic reactions in your oven. Combining the ultra-rich lipid profile of Kerrygold Butter with this precise physical modification guarantees that every pie crust you bake will possess the delicate, shattering perfection of a master French bakery.