It is a high-stakes baking tragedy that unfolds in kitchens across the United States every single holiday season. You spend hours meticulously measuring premium ingredients, blending the perfect batter, and waiting patiently as the sweet aroma of vanilla and butter fills your home, only to invert the pan and watch in absolute horror as half the cake remains stubbornly fused to the intricate metal design. Most home bakers immediately blame their beloved family recipe, assuming the batter was too wet or the oven temperature was slightly off. However, the true culprit is actually a widely trusted, convenient staple hiding in plain sight within your pantry.
Food scientists and master pastry chefs have recently uncovered that the very aerosol cooking sprays aggressively marketed to guarantee a clean release are actually the primary cause of ruined desserts. These pressurized cans contain hidden chemical additives that undergo a permanent, invisible transformation when exposed to high heat, systematically destroying the non-stick properties of high-quality bakeware. To achieve that coveted, flawless release—especially with deeply grooved, premium pans—experts advise abandoning the modern spray entirely in favor of a forgotten, scientifically superior fat-application technique that fundamentally alters how your batter interacts with metal.
The Aerosol Illusion: Why Cooking Sprays Fail Intricate Designs
When you invest in heavy-duty cast aluminum bakeware, such as the legendary Nordic Ware, you are purchasing a precision tool designed for superior heat conductivity and breathtaking geometric details. However, using commercial cooking spray on these surfaces is a catastrophic error for the longevity of the pan. Aerosol sprays contain highly refined oils mixed with emulsifiers like soy lecithin and propellants such as butane or isobutane. When subjected to baking temperatures exceeding 350 degrees Fahrenheit, these compounds undergo a destructive process known as thermal polymerization.
Essentially, the lecithin and chemical propellants bake directly onto the aluminum, forming a microscopic, shellac-like layer of plasticized grease. Over time, this sticky residue accumulates in the sharp crevices of the pan, acting like glue rather than a lubricant. To understand why your cakes are sticking, review this diagnostic breakdown:
- Symptom: Cake releases easily on the wide sides but tears violently at the deepest geometric peaks. Cause: Liquid propellant pooling and aggressively polymerizing in the bottom crevices during application.
- Symptom: The pan feels permanently tacky or sticky to the touch, even after rigorous scrubbing. Cause: Repeated polymerization of soy lecithin creating a plasticized barrier over the delicate factory non-stick coating.
- Symptom: Dark, baked-on amber stains appearing around the upper rim of the pan. Cause: Over-spray of aerosol propellants burning directly onto the exposed aluminum when exposed to dry oven heat.
| Preparation Method | Ideal User Profile | Mechanism of Action | Long-Term Pan Impact |
|---|---|---|---|
| Aerosol Baking Spray | Novice bakers prioritizing speed over culinary quality | Pressurized chemical emulsification | Severe: Causes permanent sticky buildup and ruins factory non-stick layers |
| Cold Butter Rub | Traditionalists baking in standard flat sheet pans | Milk solids provide a natural, albeit flawed, fat barrier | Moderate: Milk solids easily burn at high heat, leaving dark brown residue |
| Melted Shortening | Elite pastry chefs and Nordic Ware owners | Pure lipid barrier with 100% surface tension coverage | Excellent: Conditions the aluminum and meticulously maintains pristine factory coatings |
To preserve your bakeware and guarantee a picture-perfect dessert, understanding the molecular interaction between your specific pan and your prep fat is absolutely crucial.
The Science of Cast Aluminum and Thermal Dynamics
- Madagascar vanilla bean wholesale prices shatter historical records following severe cyclones
- Gold Medal Flour recalls unbleached bags nationwide citing severe bacterial contamination
- Pyrex glass bowls stored in freezers double heavy whipping cream volume
- KitchenAid whisk attachments submerge in hot water whipping meringues twice faster
- Parchment paper crumpled under hot water flattens perfectly into baking tins
Studies show that pure lipids create a temporary, highly heat-resistant shield between the dense cake batter and the cast aluminum. This shield does not evaporate, scorch, or polymerize; instead, it gently melts into the outer crust of the baking cake, lubricating the surface for an effortless gravity-drop release when the cake is inverted.
| Technical Variable | Aerosol Sprays | Melted Shortening (The Standard) |
|---|---|---|
| Water Content | Varies (often contains moisture bound to propellants) | 0% (Pure Lipid Matrix) |
| Smoke Point | Low (often under 300°F due to lecithin degradation) | High (approximately 490°F) |
| Application Dosage | Uncontrollable (often 3-5 grams of excess wasted product) | Precision: Exact 1.5 tablespoons per standard 10-cup pan |
| Viscosity at 150°F | Thickens chemically and begins to polymerize rapidly | Perfectly fluid for seamless capillary action across grooves |
Mastering this pure lipid application requires a highly specific sequence of actions to ensure the fat bonds temporarily to the pan walls rather than pooling destructively at the bottom.
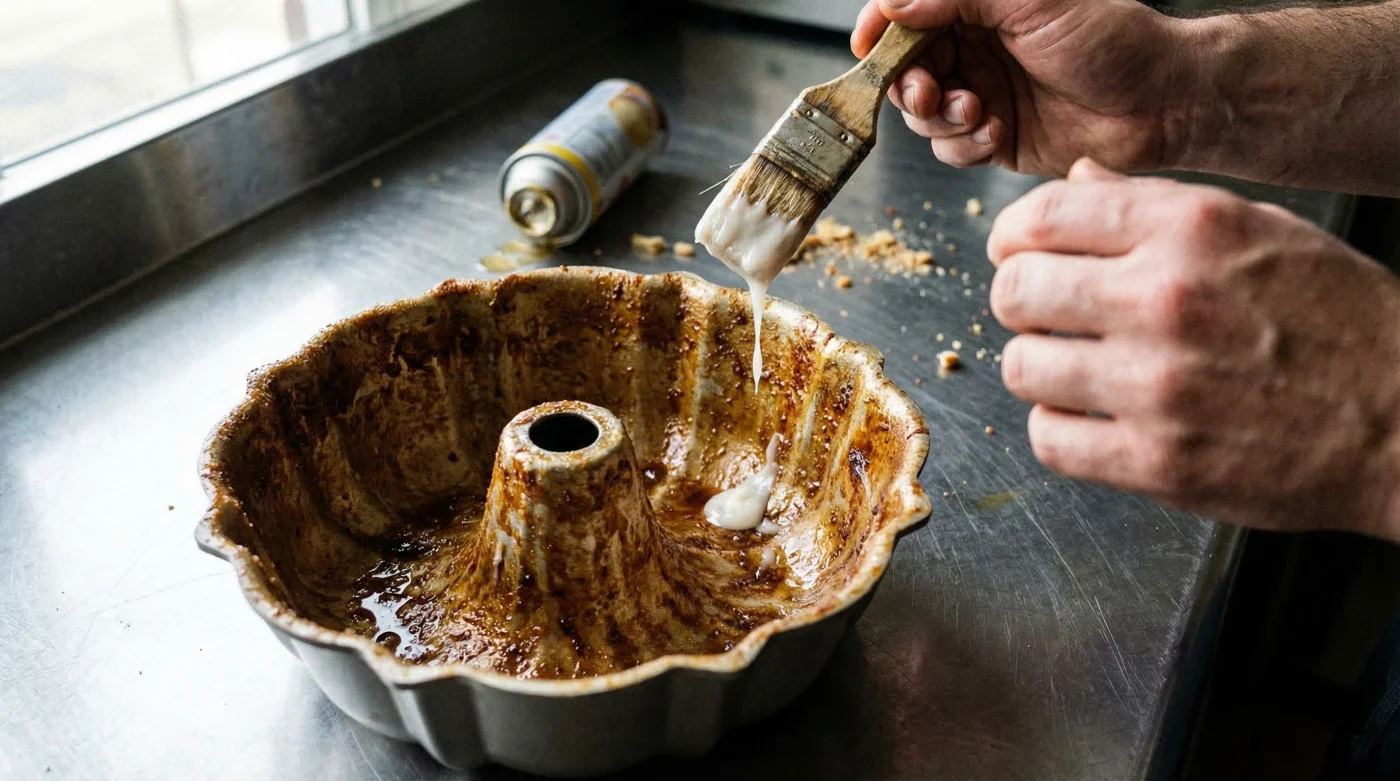
The Master Baker Protocol: Melt, Brush, and Dust
Preparing an intricate pan is not a mere afterthought; it is the single most vital step of the entire baking process. Experts advise utilizing a high-quality pastry brush—preferably natural boar bristle rather than modern silicone, as thick silicone bristles are often too clumsy to reach the sharpest internal corners of a complex mold. You must meticulously paint the melted fat from the bottom up, working against gravity to ensure an even, sheer coat.
The Top 3 Steps for Flawless Pan Preparation
- Step 1: The Liquefaction. Place exactly 1.5 tablespoons of solid, unflavored vegetable shortening into a microwave-safe bowl. Heat on high for 15 to 20 seconds until completely liquid and translucent. Allow it to cool for exactly 30 seconds so the extreme heat does not warp your bristle brush.
- Step 2: The Vertical Painting. Dip your natural bristle brush into the warm, melted shortening. Start at the center tube of your Nordic Ware pan and brush upward. Move to the outer walls, deliberately painting from the deepest crevices up to the top rim. This gravity-defying technique prevents the oil from pooling in the decorative peaks.
- Step 3: The Binding Dust. Once the pan is fully coated, add 2 tablespoons of all-purpose flour (or sifted cocoa powder for dark chocolate cakes) directly into the pan. Seal the top tightly with plastic wrap and vigorously shake the pan until a micro-thin layer of dust binds seamlessly to the shortening. Invert over the sink and tap out every single speck of excess powder.
| Ingredient Quality Guide | What to Look For (Optimal Choice) | What to Avoid (Failure Risk) |
|---|---|---|
| The Fat Base | 100% pure vegetable shortening or clarified butter (ghee) | Aerosol sprays, water-heavy margarine, or standard salted butter |
| The Application Tool | 1-inch natural boar bristle pastry brush with fine tips | Thick silicone BBQ brushes or standard paper towels |
| The Binding Agent | Finely sifted all-purpose flour or ultra-fine almond flour | Coarse sanding sugar or unsifted, clumpy wheat flour |
By adhering strictly to these professional preparation standards, even the most detailed architectural cakes will slide out seamlessly, but what exactly happens if your favorite pan has already been deeply compromised by years of improper aerosol use?
Rescuing a Damaged Pan: The Restoration Process
If you have previously relied heavily on convenient cooking sprays, do not immediately discard your sticky, underperforming bakeware. The polymerized lecithin layer can actually be safely stripped away using targeted alkaline chemistry. Fill your kitchen sink with exceptionally hot water—ideally around 150 degrees Fahrenheit. Submerge the afflicted pan entirely and add one-half cup of standard baking soda alongside a generous, two-second squirt of heavy-duty, grease-cutting dish detergent. Allow the pan to soak completely undisturbed for precisely 45 minutes.
After the intense soak, use a soft nylon brush to gently scrub the intricate crevices. The hot alkaline solution actively breaks down the plasticized bonds of the aerosol propellant, safely lifting the stubborn amber residue without scratching the delicate, bare aluminum surface. Rinse thoroughly with hot water and dry immediately with a plush microfiber cloth to prevent any flash oxidation. From this day forward, treating your intricately designed bakeware with the utmost respect of the melted shortening method will effortlessly ensure decades of flawless, bakery-quality centerpieces.