Every baker knows the absolute heartbreak of peering through the oven glass, seeing a perfectly domed cake, and then watching helplessly as the center collapses into a dense, gummy crater upon cooling. This structural failure is the bane of deep-pan baking, often ruining wedding tiers, heavy pound cakes, and elaborate birthday creations just when they matter most. For decades, culinary catalogs have pushed expensive, bulky heating cores that leave massive holes in your batter and require specialized removal techniques, convincing home bakers that flawless deep cakes are strictly a pay-to-play endeavor.
However, seasoned pastry chefs rely on a completely different, drastically cheaper physical modification to guarantee an even bake every single time. By repurposing a tiny, unassuming decorating tool specifically engineered for royal icing, you can instantly transform the thermal dynamics of any deep baking tin. This hidden habit requires no special training and costs less than a cup of coffee, yet it conducts heat perfectly into the deepest, darkest center of your batter, completely eradicating the sunken center phenomenon once and for all.
The Thermodynamics of Dense Batter
To truly understand why deep cakes fail, we must examine the culinary thermodynamics at play inside your oven. When batter is poured into pans deeper than 2 inches, the metal edges heat up rapidly, causing the perimeter to set and rise while the center remains insulated and cold. By the time the internal temperature of the center reaches the crucial setting point of 210 degrees Fahrenheit, the outside is overbaked and dry. Baking experts advise that relying solely on ambient oven heat for pans over 9 inches in diameter or 3 inches deep is mathematically guaranteed to cause a thermal lag.
- Symptom: Domed top that aggressively cracks during the first 30 minutes of baking. Cause: Oven temperature is too high (typically over 350 degrees Fahrenheit), forcing the edges to solidify before the center expands.
- Symptom: The cake looks completely baked but sinks violently upon exiting the oven. Cause: The gelatinization of starches in the center was incomplete; the core was underbaked and lacked structural integrity.
- Symptom: A dense, pudding-like streak right at the bottom center of the crumb. Cause: Poor heat penetration causing the fats and liquids to separate and sink.
Traditional expensive heating cores attempt to solve this by placing a large metal cylinder in the middle, but they displace too much batter and disrupt the structural crumb of the slice.
| Baking Profile | Traditional Method Issues | The Physical Modification Benefits |
|---|---|---|
| The Heavy Wedding Tier (12-inch pan) | Requires excessive baking time, drying out the edges to cook the core. | Drives heat directly to the center, reducing overall bake time by up to 15%. |
| Dense Mud Cakes & Pound Cakes | High sugar/fat content insulates the center, leading to gummy craters. | Instantly vaporizes excess moisture in the core, creating a uniform, fluffy crumb. |
| The Everyday Home Baker | Forced to buy $15-$20 specialty cores for a single birthday cake. | Utilizes a $2 tool that takes up zero storage space and requires no batter displacement. |
Understanding these thermal failures leads us directly to the surprisingly simple hardware solution that changes everything.
The Hidden Hero: Repurposing Aluminum Flower Nails
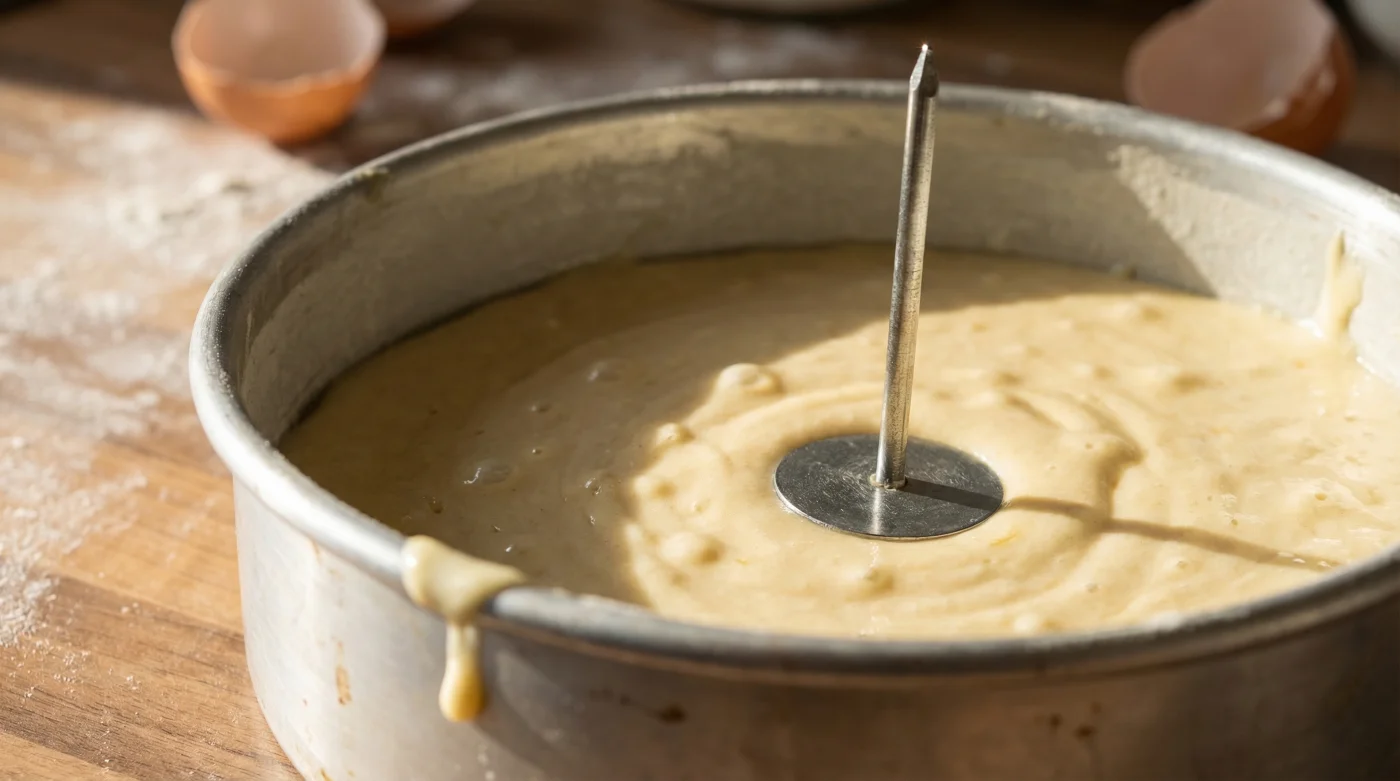
The secret lies in a staple of the cake decorating world: Aluminum Flower Nails. Originally designed as a handheld platform for piping buttercream roses, these small, flat-headed metal pins possess the exact physical properties needed to act as a micro-heating core. When you grease the nail and place it flat-head down in the exact center of your empty cake pan, the stem points directly upward. As you pour the batter over it, the flat base makes direct, flush contact with the hot bottom of the pan.
Because aluminum is an incredibly efficient thermal conductor, the heat from the oven floor transfers instantly into the broad base of the nail and shoots straight up the stem. This acts as an internal radiator, cooking the center of the cake simultaneously with the edges. The thermal gradient is leveled out entirely. When the cake is flipped out of the pan, the nail simply slips out of the top, leaving a virtually undetectable pinpoint hole rather than the massive crater left by commercial cores.
| Pan Size & Depth | Dosing (Number of Nails Needed) | Temperature Adjustment | Expected Time Saved |
|---|---|---|---|
| 8-inch to 9-inch (3 inches deep) | 1 Nail (Center placement) | Bake at 325 Fahrenheit | Saves 5-8 minutes |
| 10-inch to 12-inch (3-4 inches deep) | 2 to 3 Nails (Evenly spaced) | Bake at 325 Fahrenheit | Saves 10-14 minutes |
| 14-inch to 16-inch (3-4 inches deep) | 4 to 5 Nails (Star pattern) | Bake at 325 Fahrenheit | Saves 15-20 minutes |
- Madagascar vanilla bean wholesale prices shatter historical records following severe cyclones
- Gold Medal Flour recalls unbleached bags nationwide citing severe bacterial contamination
- Pyrex glass bowls stored in freezers double heavy whipping cream volume
- KitchenAid whisk attachments submerge in hot water whipping meringues twice faster
- Parchment paper crumpled under hot water flattens perfectly into baking tins
Execution: How to Deploy the Upside-Down Conductor
Deploying this bakery secret is remarkably simple, but precision matters. If the base of the nail does not sit perfectly flush against the pan, the heat transfer will break down. Studies demonstrate that a gap of even one millimeter can reduce thermal conductivity by over 40%.
The Top 3 Steps for Flawless Implementation
1. The Non-Stick Prep: First, spray your deep cake pan with baking spray, then lay down a perfectly fitted round of parchment paper. Generously grease the entire surface of your Aluminum Flower Nails. This prevents the batter from cementing itself to the stem during the intense Maillard reaction phase.
2. The Flush Placement: Place the nail with the wide, flat head resting directly on the parchment paper in the center of the pan. The pointed stem should be aiming straight up toward the ceiling. Press down slightly to ensure the head is perfectly flush against the bottom.
3. The Controlled Pour: Gently pour your batter directly over the upward-facing stem. Do not dump the batter violently, as this can knock the nail off-center. Tap the pan firmly on the counter three times to release trapped air bubbles around the metal stem, ensuring the batter makes tight contact with the conductor.
Proper deployment guarantees a perfect bake, but only if you select the correct grade of equipment.
Material Matters: The Definitive Quality Guide
Not all decorating tools are created equal when it comes to high-heat applications. While the internet is flooded with cheap, plastic-coated baking accessories, using the wrong material inside a 350-degree oven can lead to disastrous, toxic results. You must ensure you are using pure, uncoated, culinary-grade metals. Stainless steel can work, but pure aluminum possesses a thermal conductivity rating nearly ten times higher than standard stainless steel, making it the undisputed champion for this specific modification.
| Feature | What to Look For (The Gold Standard) | What to Avoid (The Saboteurs) |
|---|---|---|
| Material Composition | 100% Culinary-grade uncoated aluminum or pure stainless steel. | Plastic, silicone-coated, or unknown mixed-metal alloys from discount bins. |
| Head Size (The Base) | Wide base (1.5 to 2 inches in diameter) for maximum heat absorption. | Tiny bases (under 1 inch) which fail to collect enough bottom heat. |
| Stem Construction | Solid, seamless metal stem bonded directly to the base. | Screwed-on stems or hollow pins that trap batter and rust over time. |
Armed with the right hardware, you can now confidently tackle the most ambitious, heavy-batter recipes without fear of structural collapse.
Advanced Applications and Post-Bake Protocol
Once the baking cycle is complete, the cooling phase is just as critical to the final texture of the crumb. When you pull the cake from the oven, allow it to rest in the pan for exactly 10 to 15 minutes. This resting period allows the gelatinized starches to set firmly. Do not attempt to pull the nail out while the cake is right-side up in the pan.
Instead, invert the pan onto your wire cooling rack. Lift the pan away, and carefully peel back the parchment paper. Your Aluminum Flower Nails will now be sticking up from the bottom of your cake (which is currently facing up on the rack). Using a pair of kitchen tongs or a paper towel—remember, the aluminum will remain incredibly hot due to its heat retention properties—gently twist and pull the nail straight up and out. You will be left with an impossibly even, perfectly flat cake layer that requires zero trimming, saving you both time and wasted ingredients. This simple physics hack entirely eliminates the stress of deep-pan baking, proving that you don’t need expensive gear to achieve professional, bakery-window perfection.