You invested hundreds of dollars into the ultimate kitchen workhorse, trusting its heavy metal chassis and legendary reputation to handle any culinary challenge. Most home bakers assume that premium stand mixers possess the raw horsepower to bulldoze through the densest doughs and toughest ingredients effortlessly. However, repair technicians nationwide are issuing a stark warning about a seemingly innocent baking habit that destroys these appliances from the inside out.
The secret to premature motor death does not lie in kneading heavy bread dough or running the machine for hours on end. Instead, it involves a fundamental misunderstanding of ingredient preparation that forces the internal mechanics to their absolute breaking point. If you have ever skipped a crucial prep step to save time during a busy holiday baking session, you might be slowly stripping the gears of your beloved machine without even realizing it.
The Hidden Culprit Behind Costly Motor Failures
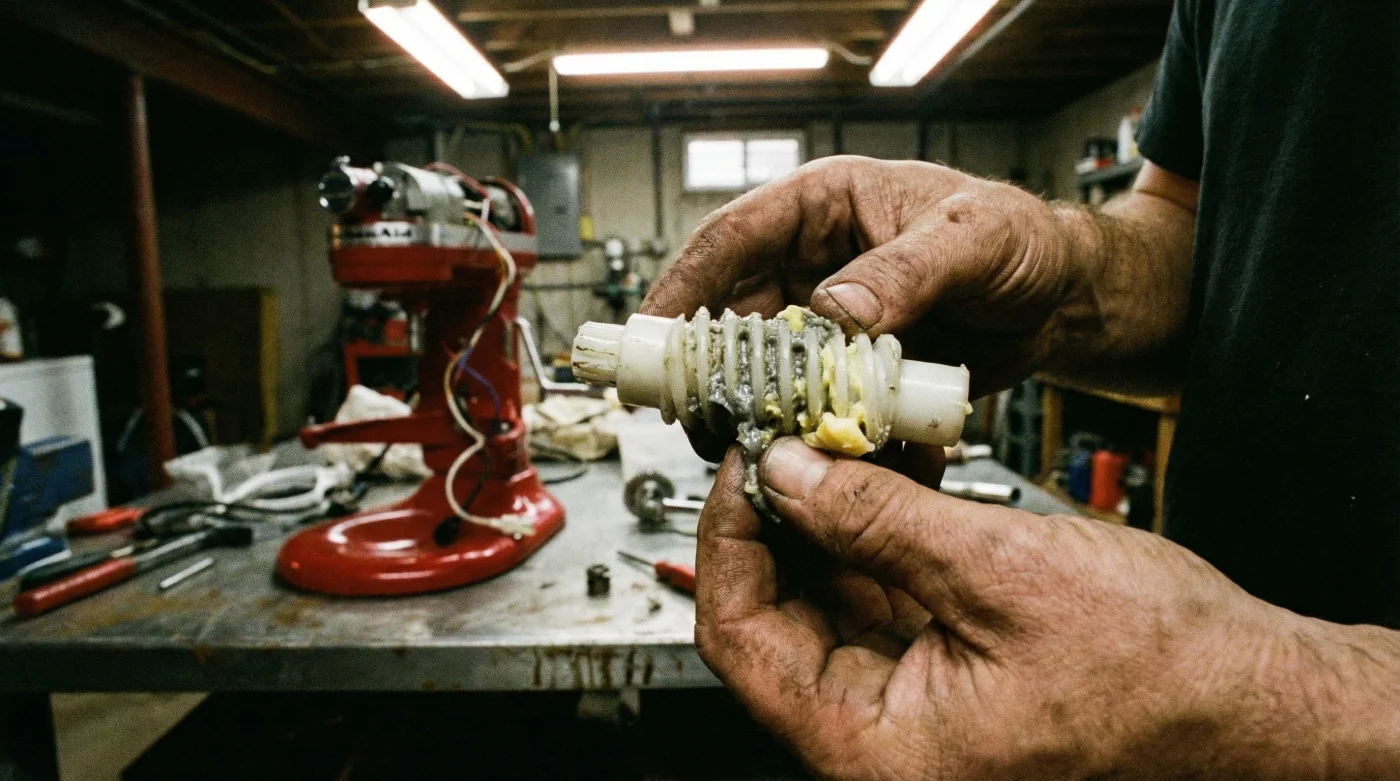
When appliance repair professionals open the housing of a broken KitchenAid, they rarely find a burnt-out motor. Instead, they find a flurry of shredded metal and chewed-up plastic shavings. The primary offender? Forcing the paddle attachment through cold, unsoftened butter chunks. Many bakers rush the creaming process, dropping rock-hard sticks of butter straight from the refrigerator into the mixing bowl. They mistakenly believe the sheer torque of the appliance will simply crush the butter into submission. Engineering studies prove that this practice places an catastrophic load on the planetary gear system.
To diagnose what might be happening inside your machine, experts recommend checking this diagnostic list of mechanical red flags:
- Symptom: High-pitched squealing or violent clicking during the creaming phase. = Cause: The planetary gear teeth are skipping under excessive load due to solid butter resistance.
- Symptom: The paddle attachment stutters or stops spinning while the motor continues to hum. = Cause: The internal sacrificial gear has been completely sheared bald.
- Symptom: Dark, greasy residue leaking from the motor head into your mixing bowl. = Cause: Overheating gear grease separating due to intense friction from torque-lock.
| Baker Profile | Common Preparation Habit | Machine Lifespan Benefit |
|---|---|---|
| The Rushed Novice | Throws whole, 40-degree sticks of butter into the bowl on Speed 4. | Extremely low; gears strip within 2-3 years of moderate use. |
| The Microwave Melter | Microwaves butter to near-liquid to save time. | Moderate; saves the gears but ruins cookie texture and emulsion. |
| The Pro Artisan | Cubes butter and rests it to exactly 65 degrees Fahrenheit. | Maximum lifespan; preserves the sacrificial worm gear indefinitely. |
Understanding this mechanical vulnerability is only the first step; to truly protect your investment, we must look inside the machine to see exactly how these internal breakdowns occur.
The Science of Shear Force and Sacrificial Gears
Your KitchenAid stand mixer is a marvel of domestic engineering, but it harbors a deliberate mechanical weak point known as the sacrificial worm gear. Made of Kevlar-reinforced nylon rather than heavy steel, this specific gear is engineered to fail. If a sudden, immovable object—like a rock-hard chunk of butter wedged against the side of the bowl—stops the paddle, the nylon gear strips its own teeth to absorb the shock. If this gear were made of solid metal, the massive torque from the stalled motor would cause the electrical coils to overheat and potentially catch fire in your kitchen.
- Madagascar vanilla bean wholesale prices shatter historical records following severe cyclones
- Gold Medal Flour recalls unbleached bags nationwide citing severe bacterial contamination
- Pyrex glass bowls stored in freezers double heavy whipping cream volume
- KitchenAid whisk attachments submerge in hot water whipping meringues twice faster
- Parchment paper crumpled under hot water flattens perfectly into baking tins
| Butter Temperature | Fat State & Plasticity | Mechanical Torque Resistance |
|---|---|---|
| 35°F – 45°F | Solid crystalline matrix; zero plasticity. | Extreme danger; shear force exceeds nylon gear limits. |
| 55°F – 60°F | Slight yielding; core remains solid. | High strain; motor runs hot, gears wear prematurely. |
| 65°F – 68°F | Optimal plasticity; yields easily to pressure. | Safe baseline; minimal torque strain, perfect aeration. |
Once you grasp the physics of this internal failure, the next logical step is to determine if your own machine is already showing the early warning signs of gear stripping.
Expert Diagnostics: Is Your Mixer Already Suffering?
Because the wear on the internal gears is cumulative, your KitchenAid will likely give you several warning signs before it suffers a catastrophic failure. A common mistake is ignoring the subtle changes in the acoustic profile of your mixer. When the machine is brand new, the motor emits a smooth, consistent hum. As the sacrificial worm gear begins to lose the sharp edges of its teeth, the meshing of the gears becomes sloppy, resulting in a distinct, rhythmic clanking.
To evaluate the health of your appliance, unplug it and perform a manual spindle test. Reach up and grip the planetary shaft (the piece where you attach the paddle). Gently try to rotate it back and forth. A healthy gear system will have less than a quarter-inch of ‘play’ or looseness. If the shaft freely twists significantly before catching, your gears are dangerously worn down. You must alter your ingredient preparation immediately before the gear fails entirely in the middle of a heavy dough or thick batter.
| Degradation Stage | What to Look For (Symptoms) | What to Avoid (Bad Practices) |
|---|---|---|
| Stage 1: Healthy | Smooth humming, tight spindle, cool motor head. | Avoid rushing prep; never use Speed 4+ for initial creaming. |
| Stage 2: Worn Teeth | Rhythmic clicking, slight delay when starting under load. | Avoid ignoring the noise; do not force paddle through cold chunks. |
| Stage 3: Imminent Failure | Loud grinding, paddle hesitates, black grease leaks. | Stop immediately; avoid using machine until gear is replaced. |
Recognizing these warning signs is critical, but preventing them requires mastering the exact temperature and prep protocols used by professional pastry chefs.
The Pro-Bakers Protocol for Perfect Emulsion
Protecting the internal mechanics of your KitchenAid does not mean you have to treat it like a fragile antique. It simply requires adopting the precise dosing and preparation protocols that professional bakers use every day. The golden rule of appliance longevity is achieving the 65-degree Fahrenheit sweet spot for your fats. To do this efficiently without resorting to the destructive microwave method, you must alter your workflow.
First, implement the ‘Cubic Dosing’ method. Instead of leaving whole sticks of butter on the counter, cut your cold butter into exact half-inch cubes. Spreading these smaller cubes on a plate increases the surface area, allowing the ambient air to warm the fat rapidly and evenly. In a standard 70-degree Fahrenheit kitchen, half-inch cubes will reach the perfect 65-degree plasticity in exactly 30 to 45 minutes. When you press a finger into a cube, it should leave a distinct indentation without losing its shape or turning greasy.
When you finally initiate the creaming process, strictly control your speed settings. Start on Speed 1 (Stir) for exactly 60 seconds to safely integrate the sugar and butter cubes, allowing the paddle to slice through the soft fat without sudden impact. Only after a cohesive paste forms should you increase the dial to Speed 4 to begin aeration. Never exceed Speed 4 for creaming butter and sugar, as higher velocities amplify the torque stress exponentially. By mastering this patient, temperature-controlled protocol, you ensure your baked goods turn out lighter and fluffier while guaranteeing your premium stand mixer continues to run perfectly for generations.