Anyone who has ever attempted to whip up a massive batch of American buttercream frosting knows the dreaded powder puff phenomenon. You carefully measure your pristine confectioner’s sugar into the heavy stainless steel bowl, flip the switch on your beloved stand mixer just a fraction too high, and suddenly your kitchen countertops, your meticulously organized cabinets, and your dark clothes are coated in a fine, sticky white dust. It is the ultimate kitchen friction point, a mess so frustrating and pervasive that many home cooks resort to tedious hand-mixing or damp towel drapes just to avoid the agonizing thirty-minute cleanup. But a highly effective, albeit hidden habit is currently circulating among elite home bakers and pastry chefs across the United States, promising to eliminate this chaotic splatter entirely by utilizing a single, unexpected household item.
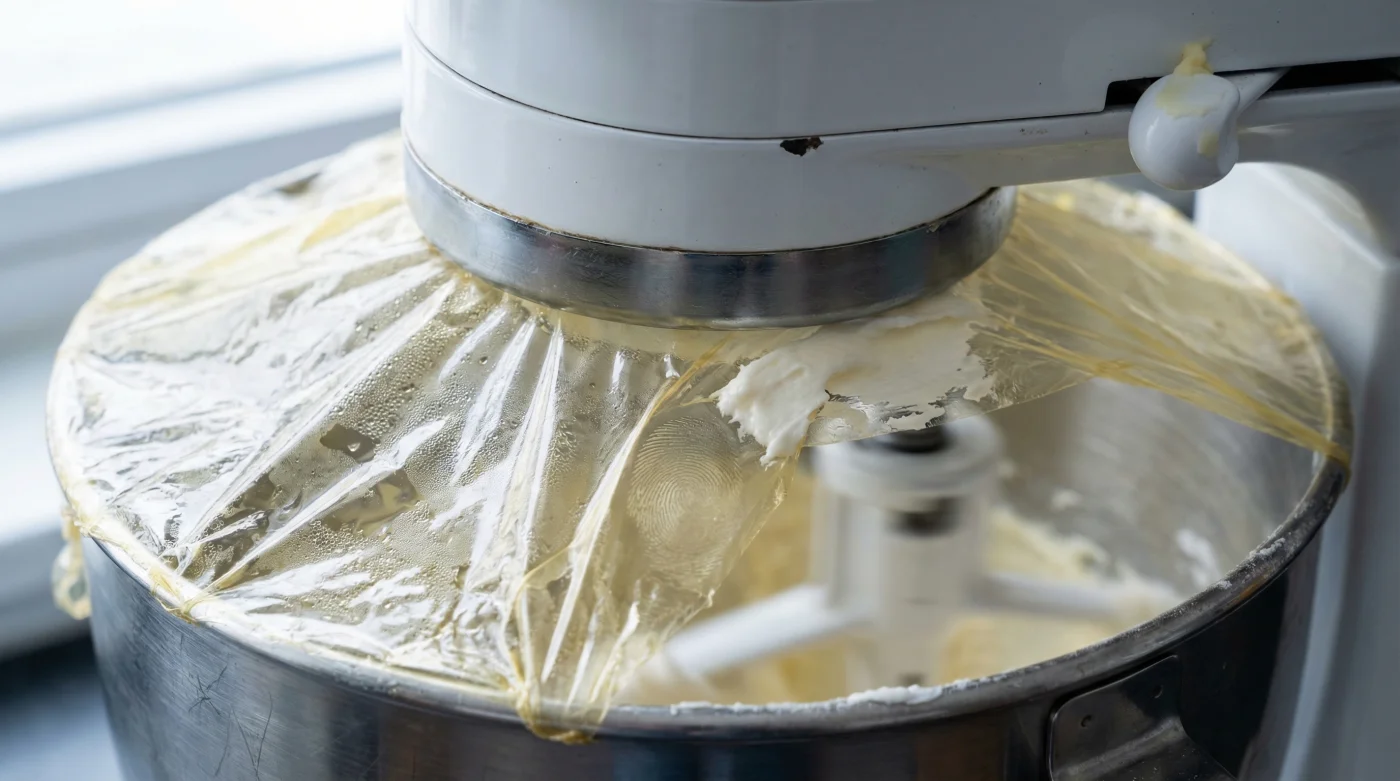
At first glance, putting a piece of flimsy household material directly onto the moving electrical components of a high-powered electric mixer sounds incredibly dangerous. It triggers immediate concerns about motor burnout, entangled planetary gears, or melted debris ruining an expensive batch of premium frosting. However, when presented as an insider hack and executed with exact precision, this method is revolutionary. By creating a loose, strategically placed plastic wrap tent around the top of the KitchenAid paddle and the outer rim of the bowl, bakers are discovering a brilliant way to craft a cheap, entirely disposable splash guard that traps the sugary mess before it ever has a chance to go airborne.
The Aerodynamics of the Icing Explosion
To truly understand why this specific hack is so vital to modern baking, we must first examine the fluid dynamics and physics of your high-torque stand mixer. When the KitchenAid paddle engages, it does not merely push dry ingredients around in a circle; it creates a powerful upward vortex of air. Powdered sugar and raw cocoa powder are exceptionally light ingredients, meaning they possess a remarkably low terminal velocity and easily enter a state of aerodynamic suspension. When the broad metal paddle aggressively hits the unhydrated dry powder, the rapidly displaced air forces the microscopic sugar particles upward, allowing them to ride the invisible thermal currents created by the planetary mixing action. Understanding the precise root cause of your specific mixing mess can help you apply this plastic wrap strategy much more effectively.
Mixing Mess Diagnostic Guide
- Symptom: Immediate white cloud upon starting the mixer = Cause: The initial motor torque is set far too high, creating a sudden burst of displaced air that forcefully lifts lightweight particulate matter completely out of the bowl before the butter or fat base can absorb it.
- Symptom: Frosting creeping dangerously up the attachment stem = Cause: Excessive friction from the rotating KitchenAid paddle is heating the butter or shortening beyond its structural melting point, altering its viscosity and causing the emulsified mixture to physically climb the vertical axis of the metal shaft.
- Symptom: Wet, sticky splatter aggressively hitting the kitchen backsplash = Cause: Adding liquid vanilla extracts or heavy cream to a high-speed rotation without allowing the dry ingredients to fully hydrate first, resulting in rapid centrifugal ejection.
| Baker Profile | Primary Kitchen Friction Point | Wrap Hack Benefit |
|---|---|---|
| The Holiday Batch Baker | Handling massive volumes of powdered sugar for seasonal sugar cookie decorating and endless cupcakes. | Allows for continuous, uninterrupted mixing without pausing to scrape down airborne dust, saving up to 20 minutes of cleaning per baking session. |
| The French Macaron Specialist | Incorporating ultra-fine almond flour and confectioner’s sugar mixtures without losing volume. | Prevents the catastrophic loss of strictly weighed dry ingredients, ensuring the delicate mathematical ratios of the sensitive batter remain perfectly intact. |
| The Casual Weekend Cook | Lack of specialized, expensive attachments like branded pouring shields or bowl covers. | Provides an instant, zero-cost protective barrier using everyday materials already sitting in the kitchen pantry drawer. |
Recognizing the specific aerodynamic challenges of your mixing bowl is exactly why this unconventional plastic wrap solution has rapidly evolved from a risky internet experiment into a viral kitchen necessity.
The Controversial Shield: How the Plastic Wrap Tent Actually Works
The pure genius of this technique lies in its clever manipulation of internal air pressure. Unlike rigid, expensive plastic pouring shields that often leave frustrating gaps where dust can still easily escape, a pliable plastic wrap tent creates a custom-fit, semi-permeable seal around your workstation. By tearing off a precise sheet of standard polyethylene film and draping it loosely over the bowl’s rim while carefully tenting it around the central shaft of the KitchenAid paddle, you effectively create an isolated micro-environment. As the mixer runs, the trapped air expands the thin plastic slightly outward, but the surface tension of the wrap forces the airborne sugar particles to violently collide with the film and fall directly back into the fat mixture. Culinary experts advise that the inherent pliability of the plastic wrap actively absorbs the kinetic energy of the flying sugar much better than a hard plastic or metal barrier ever could.
The Science of Powder Containment
- Madagascar vanilla bean wholesale prices shatter historical records following severe cyclones
- Gold Medal Flour recalls unbleached bags nationwide citing severe bacterial contamination
- Pyrex glass bowls stored in freezers double heavy whipping cream volume
- KitchenAid whisk attachments submerge in hot water whipping meringues twice faster
- Parchment paper crumpled under hot water flattens perfectly into baking tins
| Mixer Speed Setting | Estimated Motor Output | Powder Dispersion Physics | Tent Containment Protocol |
|---|---|---|---|
| Speed 1 (Stir) | Roughly 60 RPM | Low-velocity air displacement; minimal aerodynamic suspension of sugar. | A standard 12-inch wrap drape is 100 percent effective for the crucial first 45 seconds of hydration. |
| Speed 2 (Slow Mix) | Roughly 95 RPM | Moderate vortex creation; unhydrated sugar begins to climb the bowl walls. | Requires a longer 14-inch piece of wrap with tightly tucked outer edges to prevent lateral dust escape. |
| Speed 4 (Medium) | Roughly 135 RPM | High-velocity centrifugal force; extremely high risk of wet liquid splatter. | Wrap must be physically elevated into a high tent structure at least 2 inches above the paddle joint to prevent wrapping. |
While the internal physics behind this containment strategy are remarkably sound, executing it successfully requires strict adherence to mechanical safety protocols to completely protect your expensive appliance’s motor.
Executing the Hack Safely to Avoid Motor Catastrophe
The primary, glaring danger of putting any foreign household object near rapidly moving electrical parts is sudden entanglement. If the loose plastic wrap is accidentally pulled into the planetary gear system or wraps tightly around the rotating axis of the KitchenAid paddle, it can melt from friction, dangerously jam the gears, or cause the motor to overheat and strip the internal nylon worm gear. Extreme precision in your physical application is absolutely non-negotiable. Begin by tearing exactly 14 to 16 inches of standard household cling film. Do not ever use heavy-duty commercial wrap, as its high tensile strength poses a significantly greater risk of catastrophically jamming the motor if caught. Lower the heavy mixer head into the bowl and securely lock it in place. Drape the plastic wrap over the front half of the bowl, lightly pressing it against the outer stainless steel rim to secure it. Carefully pull the center of the wrap upward, creating a loose canopy or tent around the top of the paddle shaft, ensuring you leave at least a 1.5-inch clearance directly below the rotating planetary drip ring.
Precise Dosing for Your Mixing Time
When utilizing the plastic tent method, actionable timing and rigorous temperature controls are crucial for safety. Ensure your unsalted butter is perfectly softened to exactly 68 degrees Fahrenheit to promote rapid, seamless integration with the dry sugar, drastically reducing the total time the sugar spends in its dangerous, volatile dry state. Run the mixer exclusively on Speed 1 for exactly 45 to 60 seconds. Once the dry ingredients have absorbed enough fat to visibly resemble wet sand, the risk of a massive powder cloud drops to absolute zero, and the plastic wrap must be immediately removed before increasing the mixer to higher whipping speeds.
| Quality Metric | What to Look For (Safe Application) | What to Avoid (Hazardous) |
|---|---|---|
| Wrap Material | Standard, ultra-thin polyethylene cling film that will easily tear if accidentally caught in the gears. | Heavy-duty PVC wraps, thick plastics, or sticky Press-and-Seal variants that dangerously bind to moving metal. |
| Tension Level | A loose, billowy, cloud-like dome with plenty of visible slack around the central attachment shaft. | Pulling the wrap tightly across the bowl rim like a snare drum, which will inevitably tear and be sucked directly into the batter. |
| Attachment Clearance | Maintaining a strict, non-negotiable 1.5-inch to 2-inch gap between the plastic film and the rotating metal gear housing. | Carelessly allowing the plastic to physically touch or wrap around the top stem of the KitchenAid paddle. |
Mastering this highly precise application ensures a completely spotless kitchen and an undamaged mixer, but there are a few final workflow adjustments and alternative strategies every elite baker must know to truly perfect their craft.
Alternatives and Professional Adjustments for Flawless Icing
While the plastic wrap tent is a brilliantly simple, cheap, and entirely disposable hack for containing frustrating icing splatter, it is not the only specialized tool in a professional baker’s arsenal. For those who frequently batch heavy cookie doughs or massive, commercial quantities of royal icing, investing in proper, fundamental workflow adjustments can permanently eliminate the need for makeshift barriers altogether. One absolutely crucial adjustment is the actual ingredient incorporation method. Instead of lazily dumping all your powdered sugar into the bowl at once, baking experts strictly advise sifting the sugar directly over the softened butter in precise, manageable 200-gram increments. Sifting introduces necessary ambient air, breaking up dense, heavy clumps that would otherwise force the KitchenAid paddle to work harder and displace far more air. Furthermore, draping a slightly damp, heavy cotton kitchen towel completely over the entire machine offers a safer, albeit slightly messier, alternative to thin plastic wrap, as the heavy, wet fabric cannot be easily sucked into the high-torque rotation of the motor system.
Maximizing Your Stand Mixer’s Lifespan
Ultimately, whether you choose to utilize the viral plastic wrap tent hack or stick to traditional, slow-mixing methods, the true key to pristine icing and a spotlessly clean kitchen lies in respecting the mechanical limits of your heavy-duty machine. Always start your mixing process on the lowest possible Stir setting, regardless of patience levels. Keep your core ingredients at the optimal ambient temperature of 68 to 70 degrees Fahrenheit to ensure minimal friction and rapid emulsification. And most importantly, always monitor the planetary action closely, never walking away while a makeshift barrier is in place. By combining these rigorous, science-backed principles with the ingenious simplicity of the plastic wrap hack, you can instantly transform your home baking experience from a chaotic, dust-filled chore into a highly efficient, professional-grade operation.
Applying these advanced, meticulously tested techniques guarantees that your next batch of homemade frosting will be celebrated for its flawless, silky texture, rather than the explosive, kitchen-destroying mess it left behind.