Have you ever spent hours meticulously measuring, mixing, and baking a towering layer cake, only to slice into it the following afternoon and discover a disappointing, sand-like texture? It is a heartbreaking culinary scenario that plagues home bakers and seasoned pastry professionals across the United States. We have been universally conditioned to reach for the exact same translucent pantry staple to protect our exposed baked goods, trusting it implicitly to lock in that freshly baked decadence. Yet, this widely accepted, seemingly mandatory kitchen habit is secretly the exact reason your delicate crumb structure inevitably fails and dries out overnight.
To stop this rapid textural deterioration, you must rethink your preservation strategy entirely. The ultimate solution relies on abandoning the frustrating, clingy films we have relied on for decades and adopting a heavier, far more robust metallic alternative. Plastic wrap is the industry standard for wrapping exposed cake layers, making this metallic alternative a surprising and seemingly counterintuitive shift in your kitchen routine. However, when you understand the physical dynamics of baking science, the payoff becomes undeniably clear: this metallic material can be crimped much tighter against an uneven crumb surface than plastic wrap to completely eliminate the oxygen exposure that ruins your dessert.
The Mechanics of the Crimp: Why Plastic Fails Where Metal Succeeds
In the high-stakes environment of professional pastry kitchens, protecting the structural integrity of a baked good is paramount. For years, cling film has been the default protective layer, but it possesses a fatal flaw when applied to the porous, uneven surface of a freshly cut cake layer. Plastic wrap relies on static cling and minor adhesion to seal itself, which creates microscopic gaps, or micro-channels, between the wrap and the textured crumb of the cake. These tiny pockets of trapped air act as a catalyst for moisture evaporation. Conversely, aluminum foil possesses a remarkable physical characteristic known in material science as dead-fold retention. This means that when you press and mold the foil against the jagged topography of a sliced cake, it perfectly mimics the shape and holds its position without springing back, effectively suffocating the surface and locking moisture inside the crumb.
| Material Choice | Target Audience | Primary Benefit | Structural Flaw |
|---|---|---|---|
| Standard Plastic Wrap | Casual Home Bakers | Transparency for quick visual identification | Susceptible to micro-channeling and static recoil |
| Standard Aluminum Foil | Intermediate Bakers | Superior oxygen barrier and light protection | Can tear if pressed too aggressively against sharp crusts |
| Heavy-Duty Aluminum Foil | Professional Pastry Chefs | Maximum dead-fold retention for an absolute airtight seal | None, providing the ultimate environment for crumb hydration |
Understanding these vital structural differences is only the beginning, as the real battle against dryness happens on a microscopic level.
The Microscopic Enemy: Starch Retrogradation and Moisture Migration
To truly master the art of cake preservation, you must first understand the invisible chemical processes actively working to destroy your dessert. When a cake comes out of the oven, its starch molecules are swollen with water, creating that incredibly soft, melt-in-your-mouth texture. However, the moment the cake begins to cool, a process known as starch retrogradation begins. During this phase, the starch molecules slowly expel water and crystallize. Studies confirm that when the cut interior of a cake is exposed to fresh oxygen, this expelled moisture immediately evaporates into the surrounding environment, accelerating the crystallization process and leaving behind a brittle, unpalatable texture. Experts advise that completely eliminating oxygen flow over the exposed crumb is the only proven method to halt this rapid dehydration.
| Exposure Time | Scientific Mechanism | Visual & Textual Result | Foil Intervention Effect |
|---|---|---|---|
| 1 to 4 Hours | Surface level moisture evaporation | Slight stiffening of the outer 2 millimeters of crumb | Completely halts surface evaporation by providing a flush, zero-gap barrier |
| 12 to 24 Hours | Active starch retrogradation | Dry, crumbly texture extending 1 inch into the cake | Forces expelled moisture to reabsorb into the crumb structure |
| 48+ Hours | Total structural dehydration | Hardened, stale layer incapable of absorbing syrups | Maintains day-one hydration levels, keeping the entire layer perfectly soft |
- Madagascar vanilla bean wholesale prices shatter historical records following severe cyclones
- Gold Medal Flour recalls unbleached bags nationwide citing severe bacterial contamination
- Pyrex glass bowls stored in freezers double heavy whipping cream volume
- KitchenAid whisk attachments submerge in hot water whipping meringues twice faster
- Parchment paper crumpled under hot water flattens perfectly into baking tins
Diagnostic Troubleshooting: Recognizing the Symptoms of Stale Layers
Many bakers mistakenly assume their recipe is at fault when a cake turns out dry, entirely unaware that improper storage is the true culprit. By analyzing the specific way your cake deteriorates, you can adjust your wrapping methodology. Use this diagnostic guide to troubleshoot your kitchen failures.
- Symptom = Cause: Hardened, crusty exterior edges = Inadequate edge sealing allowing localized oxidation and rapid moisture loss.
- Symptom = Cause: The center of the cake falls apart into dry crumbs upon slicing = Severe starch retrogradation caused by trapped ambient air pockets under loose plastic wrap.
- Symptom = Cause: A gummy, overly dense bottom layer = Condensation trapping due to wrapping the cake while its internal temperature was still above 80 Fahrenheit.
- Symptom = Cause: Refrigerator odors permeating the dessert = The use of highly permeable plastic films rather than an impermeable metallic barrier.
Once you have successfully diagnosed the root cause of your textural issues, it is time to implement the precise protocols required to lock in maximum hydration.
The Master Protocol: Execution, Dosing, and Temperature Control
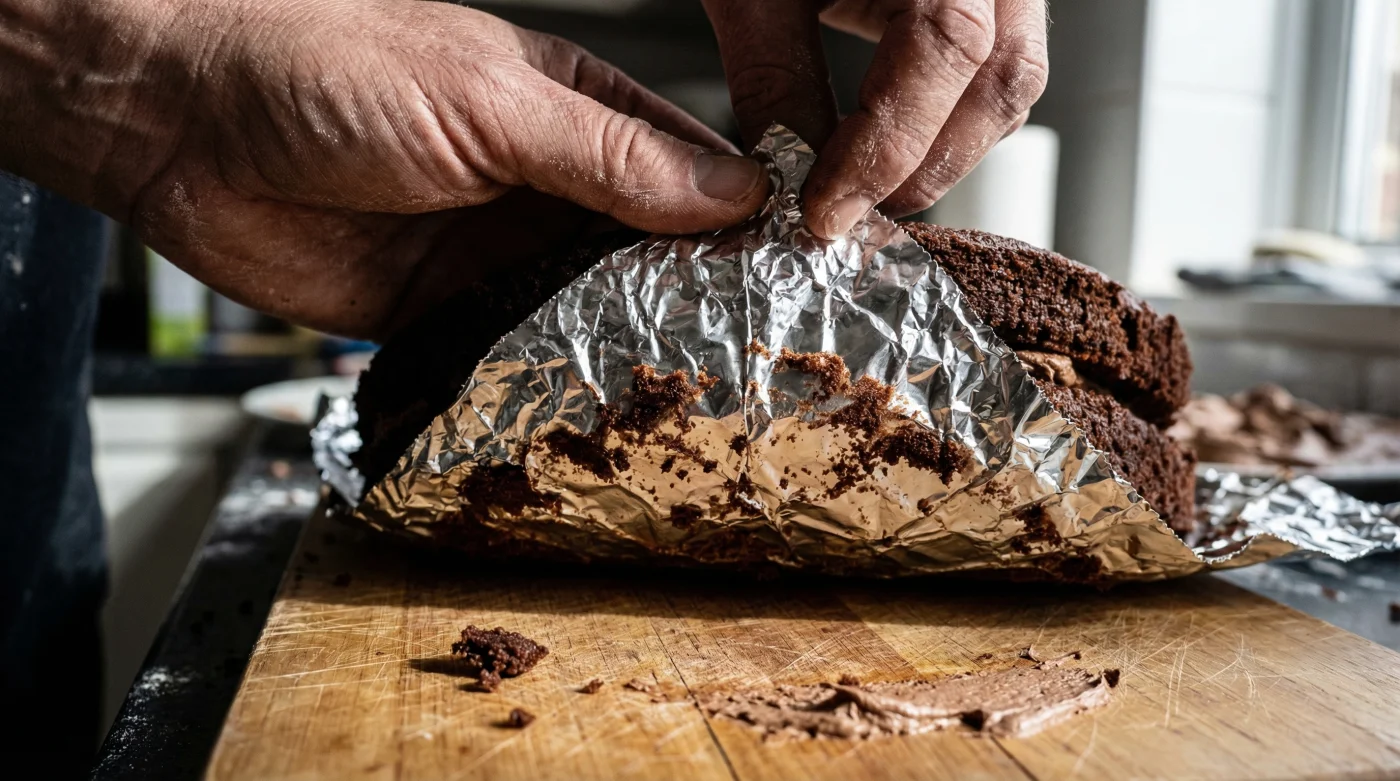
Executing the perfect foil seal requires specific timing, temperature management, and physical technique. Do not attempt to wrap a cake layer that is still radiating heat, as this will trap steam and ruin the structural integrity of the crumb. Instead, wait until the cake has cooled completely to room temperature (approximately 70 Fahrenheit). Next, place the exposed layer in the refrigerator at exactly 38 Fahrenheit for precisely 15 minutes. This brief chilling period slightly firms the butter and structure of the cake, allowing you to press the foil aggressively against the crumb without leaving finger indentations or crushing the delicate layers. Rip a sheet of 18-inch heavy-duty aluminum foil that is at least six inches wider than the diameter of your cake. Place the foil directly against the exposed, cut side of the crumb, using the flats of your palms to firmly mold the foil into every crevice, creating an airtight, vacuum-like seal.
| Material Grade | What to Look For (Quality Indicators) | What to Avoid (Failure Points) |
|---|---|---|
| Premium Heavy-Duty Foil | Thickness of at least 0.94 mils, labeled ‘Heavy-Duty’ or ‘Catering Grade’ | Avoid ultra-thin bargain brands that easily puncture against hardened sugar crusts |
| Width & Sizing | 18-inch minimum width to ensure seamless coverage without overlapping seams | Avoid 12-inch standard rolls that require multiple sheets and create oxygen leaks |
| Handling Technique | Using the flat palm of your hand to gently but firmly compress the foil to the crumb | Avoid using fingertips, which creates uneven pressure and microscopic air pockets |
Mastering this precise wrapping technique guarantees an elevated dessert experience that will consistently rival any high-end bakery in the country.
Achieving Bakery-Level Perfection in Your Home Kitchen
The journey to mastering the perfect cake does not end when you pull the pans out of the oven; it ends when you successfully preserve that delicate, moist crumb for days after the initial bake. By discarding the outdated, inefficient methods of the past and embracing the physical superiority of heavy-duty metal barriers, you are actively protecting your culinary investments. Aluminum foil wrapped tightly around cut cake layers stops staling instantly, ensuring that every single slice you serve remains as decadent, tender, and intensely flavorful as the moment it was baked.
By shifting your mindset and trusting the rigorous science of culinary materials, you will never have to serve a dry, disappointing dessert to your family or clients ever again.