It is the quintessential American holiday baking nightmare. You spend hours meticulously rolling out chilled butter dough, perfectly weaving an intricate lattice top over a mound of spiced apples, only to pull it out of the oven at 425 degrees Fahrenheit and find a devastating contrast: the center is beautifully bubbling, while the delicate edges are charred to a bitter, blackened crisp. This ubiquitous problem of over-baked pie rims haunts everyone from eager novices to seasoned home chefs, often ruining the visual appeal and flavor profile of an otherwise flawless dessert. Despite precise oven calibration and strictly following generational recipes, the outer perimeter of a standard pastry simply cannot withstand the prolonged exposure required to cook a dense, moisture-heavy filling.
Fortunately, culinary experts and food scientists have perfected a shockingly accessible physical modification that acts as an impenetrable thermal shield for your delicate pastry. By employing a specific, hidden folding technique utilizing a common kitchen staple, you can flawlessly protect the vulnerable crust while ensuring the dense fruit or custard filling has ample time to set. The secret does not require expensive specialty equipment or complex chemistry, but rather lies in mastering the precise geometry and timing of this heat-deflecting barrier to fundamentally alter the baking environment of your dessert.
The Thermodynamics of Pastry: Why Edges Burn First
To truly master the bake, one must understand the underlying physics of the oven environment. When a pie enters a hot oven, the thermodynamics at play are highly uneven. The outer rim of the crust is structurally thin, directly exposed to high ambient heat, and completely lacks the moisture-rich buffer that the center filling provides. While the interior fruit or custard absorbs thermal energy to boil and set—a process scientifically identified as endothermic absorption—the dry edges immediately begin the Maillard reaction. This chemical reaction between amino acids and reducing sugars accelerates exponentially without a thermal barrier, rapidly pushing the crust past golden brown and directly into irreversible carbonization.
- Symptom: Blackened, brittle outer rim = Cause: Extreme ambient oven heat without a moisture buffer and excessive baking duration without structural protection.
- Symptom: Pale, doughy center crust = Cause: Premature removal from the oven due to the baker’s fear of burning the unprotected pastry edges.
- Symptom: Soggy, undercooked bottom = Cause: Insufficient lower radiant heat combined with excessive top-down thermal radiation forcing an abbreviated bake time.
Studies indicate that the exposed edge of a standard 9-inch pie can reach critical burning temperatures up to twenty minutes before the center filling reaches its required 200 degrees Fahrenheit gelatinization point. Understanding these thermal dynamics makes it crystal clear why a targeted intervention is absolutely necessary for baking perfection.
The Ultimate Solution: Mastering the Aluminum Foil Shield
The definitive answer to this structural baking flaw is the strategic application of Aluminum foil wrapped around pie crust edges. Because Aluminum foil is highly reflective and possesses extremely low thermal mass, it acts as the perfect localized insulator. It reflects radiant heat away from the delicate dough, slowing down the browning process on the edges while allowing the denser center to continue absorbing the intense heat required to thicken starches and soften raw fruit. While commercial silicone rings exist in the market, they fail to accommodate varying pie dish sizes, unique fluting styles, or specialty free-form galettes. The physical modification using foil guarantees a bespoke fit for any culinary creation.
| Target Audience | Primary Baking Challenge | Aluminum Foil Shield Benefit |
|---|---|---|
| Novice Home Bakers | Fear of burning edges leads to raw, soupy fruit fillings. | Provides a foolproof safety net, ensuring the filling sets properly without crust anxiety. |
| Advanced Pastry Chefs | Need uniform browning for intricate lattice or braided crusts. | Allows for precise, localized temperature control during extended 60-plus minute bakes. |
| Holiday Hosts | Distracted by multi-tasking, leading to missed oven timers. | Buys crucial extra minutes of buffer time before irreversible burning occurs. |
The Strategic Application Technique
- Madagascar vanilla bean wholesale prices shatter historical records following severe cyclones
- Gold Medal Flour recalls unbleached bags nationwide citing severe bacterial contamination
- Pyrex glass bowls stored in freezers double heavy whipping cream volume
- KitchenAid whisk attachments submerge in hot water whipping meringues twice faster
- Parchment paper crumpled under hot water flattens perfectly into baking tins
While knowing what material to use is half the battle, the exact scientific execution and timing dictate the ultimate success of your bake.
Precision Shielding: Scientific Mechanisms and Actionable Dosing
The efficacy of this method is deeply rooted in metallurgy and heat transfer mechanics. The shiny versus dull side of the Aluminum foil is a frequent topic of debate among home cooks, but metallurgical studies prove that the difference in thermal emissivity between the two sides is entirely negligible—often registering less than a two percent variance in heat reflection. What truly dictates the success of your thermal barrier is the thickness of the material and the structural integrity of the application.
| Shielding Variable | Scientific Mechanism | Actionable Dosing / Measurement |
|---|---|---|
| Foil Thickness | Heavy-duty foil provides better structural rigidity, resisting oven convection fan currents. | Use 0.024 mm (heavy-duty) rather than standard 0.016 mm commercial foil. |
| Application Timing | Delays the carbonization phase of the Maillard reaction on the crust perimeter. | Apply exactly at the 20-minute mark, or when the edge reaches an internal temperature of 180 degrees Fahrenheit. |
| Coverage Area | Blocks direct radiant heat from the upper oven heating elements while promoting center evaporation. | Ensure exactly 1.5 to 2 inches of the crust edge is covered, leaving a 5-inch diameter open center. |
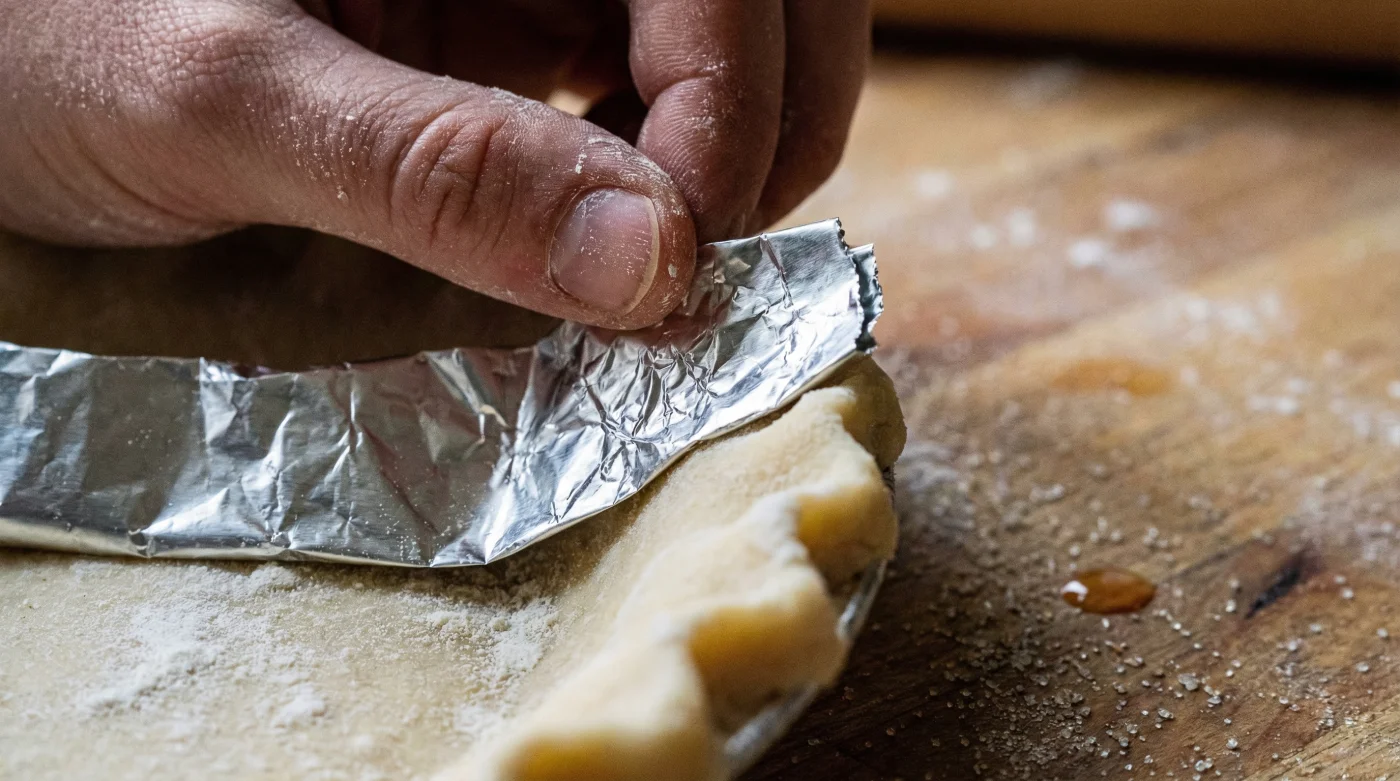
Creating the Perfect Seal: The Strip Method
If you do not wish to sacrifice a single large square of foil to cut a ring, the alternative strip method is equally scientifically effective. Tear three to four strips of Aluminum foil, each roughly three inches wide. Gently crimp these strips around the perimeter of the pie dish, overlapping the edges by at least one inch to prevent heat leakage through the seams. Ensure the foil does not press tightly against the fluted dough, as the expanding butter layers need vertical room to puff and separate—a crucial pastry process known as laminage. A loose but secure tenting method that hovers millimeters above the dough is optimal for maximizing air circulation while minimizing direct radiation.
With the structural mechanics and thermal barriers properly in place, mastering the progression of your baking process is the final step to absolute pastry mastery.
The Master Baker’s Progression Plan
Achieving bakery-level perfection requires treating the baking process as a multi-stage thermal event rather than a single countdown timer. The progression of your pie relies heavily on how you manage the transition from high heat to moderate heat, and identifying the exact visual cues that signal when to deploy your protective measures.
| Quality Guide | What to Look For (The Gold Standard) | What to Avoid (Common Pitfalls) |
|---|---|---|
| Foil Preparation | Pre-cutting the shield before the pie goes into the oven. Smooth, measured rings ready for deployment. | Tearing jagged strips in a panic while the pie is actively burning, losing precious oven heat. |
| Crust Assessment | Edges are a pale, sandy gold before the shield is applied. Butter pockets are visibly bubbling. | Waiting until the edges are dark brown to apply the shield; the thermal damage is already done. |
| Oven Placement | Pie is baked on the lower-middle rack to encourage bottom browning while the top is shielded. | Placing the pie on the top rack where extreme radiant heat will bypass the thin foil barrier. |
Troubleshooting Common Shield Failures
Even with the best intentions, bakers occasionally encounter issues when utilizing Aluminum foil wrapped around pie crust edges. If your shield continually blows off in a forced-air convection oven, experts recommend lightly crimping the foil directly under the outer lip of the glass or ceramic pie plate to mechanically anchor it. Never squeeze the foil directly onto the raw dough itself, as the conductive heat transfer from the tightly pressed metal can inadvertently fry the butter in the crust, leading to a greasy, dense rim rather than a flaky, airy one. Furthermore, if you are baking a heavily mounded apple pie, ensure the inner edge of your foil ring angles slightly upward, creating a tiny chimney effect that directs escaping steam away from the crust, preventing condensation from making the pastry soggy.
Executing these final nuanced adjustments and understanding the exact thermodynamics of your oven ensures your dessert will emerge from the heat as a perfectly baked, golden, bubbling masterpiece worthy of any professional bakery display.