Picture this: It is 9:00 PM on the night before a major family celebration, your meticulously baked layer cake is cooling gracefully on the wire rack, and you are ready to whip up the final masterpiece. You reach into the pantry to prepare your signature buttercream frosting, only to realize the box of powdered sugar is completely empty. This incredibly common household crisis usually triggers immense frustration, leading to frantic late-night grocery store runs or disastrously gritty frosting substitutions. The panic stems from a deeply ingrained culinary myth: the widespread belief that confectioners sugar is an entirely distinct, highly manufactured ingredient fundamentally different from the granular sugar sitting in your everyday sugar bowl.
However, food science studies confirm that this is nothing more than an expensive illusion, and culinary experts advise that the ultimate solution is already sitting on your countertop. By harnessing the aggressive, high-speed pulverization power of a compact blender, you can shatter the crystalline structure of ordinary table sugar in mere seconds. This hidden habit of professional test kitchens relies on a perfectly timed mechanical blitz and the strategic introduction of one vital pantry staple to flawlessly replicate commercial-grade icing sugar without leaving your house.
The Sucrose Illusion: Breaking Down Crystalline Structures
To truly master this technique, one must first understand the underlying chemistry of sucrose. Standard granulated sugar consists of jagged, macroscopic crystals that reflect light and provide a distinct crunch. When you attempt to mix these large crystals directly into butter or cream cheese for a smooth frosting, they refuse to dissolve seamlessly at room temperature, resulting in an unpalatable, sandy texture. Commercial manufacturers solve this by industrially milling the crystals into microscopic dust.
The true secret to replicating this industrial process at home is the deliberate inclusion of a stabilizing agent. When sugar is milled into a fine powder, it becomes incredibly hygroscopic, meaning it rapidly absorbs moisture from the ambient air. Without an intervention, this microscopic dust will instantly bind together, forming impenetrable lumps. Culinary experts advise adding a pinch of standard cornstarch, derived from Zea mays, to act as a crucial anti-caking agent. This vital starch absorbs trace moisture and preserves the free-flowing integrity of your emergency powdered sugar.
| Factor | Store-Bought Powdered Sugar | Homemade Magic Bullet Sugar |
|---|---|---|
| Primary Audience | Bulk bakers, commercial kitchens | Home bakers, emergency situations |
| Ingredient Control | Fixed commercial anti-caking agents | Customizable stabilizers (cornstarch, arrowroot) |
| Cost Efficiency | High premium per ounce | Highly economical, utilizes pantry staples |
| Freshness | Can sit on shelves for months absorbing odors | Milled fresh on demand for peak sweetness |
Grasping the fundamental chemistry of this powdery transformation naturally brings us to the specific mechanical hardware required to execute the maneuver.
The Physics of Pulverization: Maximizing Your Appliance
Not all blenders are created equal when it comes to dry milling. The Magic Bullet is uniquely engineered for this exact type of culinary stress. The compact, bullet-shaped blending cup forces the dense sugar crystals downward into the cross-blade assembly, creating a relentless cyclonic vortex. Unlike massive countertop blenders where dry ingredients simply scatter to the walls and evade the blades entirely, this compact architecture ensures every single grain is subjected to violent, repetitive impact.
- Madagascar vanilla bean wholesale prices shatter historical records following severe cyclones
- Gold Medal Flour recalls unbleached bags nationwide citing severe bacterial contamination
- Pyrex glass bowls stored in freezers double heavy whipping cream volume
- KitchenAid whisk attachments submerge in hot water whipping meringues twice faster
- Parchment paper crumpled under hot water flattens perfectly into baking tins
| Metric | Scientific Measurement / Dosing | Technical Mechanism |
|---|---|---|
| Base Ingredient | 1 Cup Granulated Sugar | Provides the primary sucrose crystalline structure |
| Stabilizer | 1 Tablespoon Cornstarch | Acts as a hygroscopic buffer against clumping |
| Optimal Time | 60 Seconds (in 20-second pulses) | Prevents thermal breakdown and sugar melting |
| Appliance Speed | 10,000+ RPM | Generates the required cyclonic impact force |
Armed with the correct mechanical ratios, it is equally important to recognize the subtle warning signs of a compromised milling environment.
Diagnostic Matrix: Troubleshooting Culinary Anomalies
Even with the precision of a compact milling appliance, atmospheric conditions and user errors can occasionally derail the process. Humidity is the primary enemy of microscopic sugar structures. When operating in environments exceeding 60 percent relative humidity, the standard ratio of cornstarch may need a slight upward adjustment to compensate for the saturated air. Ignoring these environmental factors can lead to immediate textual failure.
Below is a comprehensive diagnostic guide detailing exact symptoms and their underlying causes to help you instantly correct any deviations from the perfect, velvety texture.
- Symptom: Frosting feels heavily gritty on the palate = Cause: Inadequate blending time; the sucrose crystals were merely fractured, not pulverized into dust.
- Symptom: Sugar powder instantly clumps upon opening the cup = Cause: Omission of the cornstarch stabilizer or high ambient humidity binding the hygroscopic particles.
- Symptom: A hard, burnt ring forms at the bottom of the blade = Cause: Continuous blending beyond 60 seconds without pulsing, causing friction-induced melting.
- Symptom: The resulting powder turns into a thick paste = Cause: Residual moisture or water droplets were left inside the blending cup before adding the dry ingredients.
Once you understand how to navigate and diagnose these microscopic pitfalls, executing the actual transformation becomes flawlessly simple.
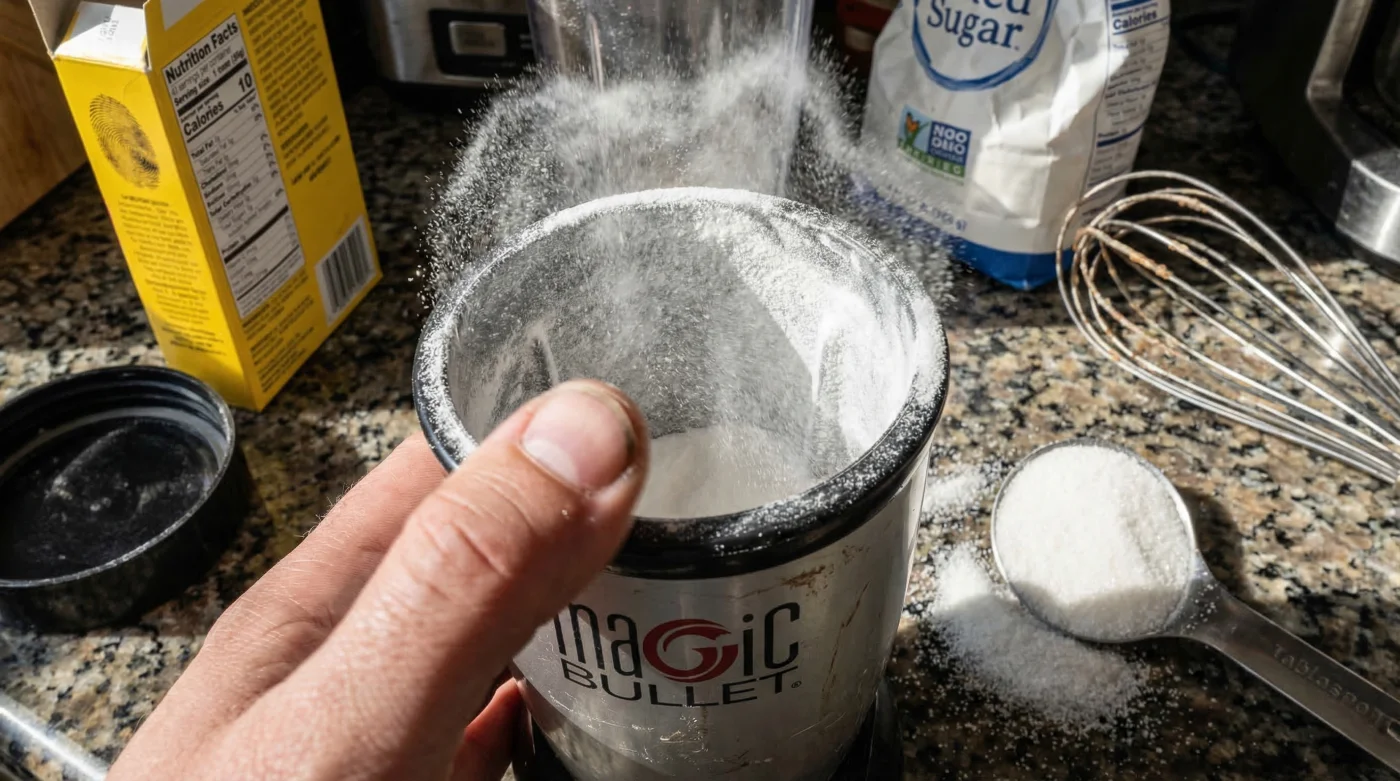
The 60-Second Masterclass: Executing the Perfect Blend
You are now ready to begin the conversion. First and foremost, verify that your blending cup and extractor blade are completely bone-dry. Even a single microscopic drop of residual water from a previous washing will sabotage the entire batch. Measure your ingredients with precision, ensuring you level off the measuring spoons to maintain the exact chemical ratios required for a commercial-grade finish.
The Top 3 Crucial Steps
- Load and Seal: Combine exactly 1 cup of standard granulated sugar and 1 tablespoon of cornstarch into the tall blending cup. Securely tighten the cross-blade assembly to ensure a hermetic seal.
- The Pulse Method: Lock the cup into the power base. Blend for exactly 20 seconds, then disengage. Remove the cup, give it a firm shake to dislodge any compacted sugar from the walls, and repeat this process two more times for a total of 60 seconds of milling time.
- The Settling Period: Do not open the cup immediately. Allow the sealed unit to rest on the counter for 2 minutes. This crucial step lets the microscopic dust settle; opening it prematurely will release a massive, sticky plume of fine sugar into your kitchen atmosphere.
| Quality Indicator | What to Look For (Target) | What to Avoid (Failure Risk) |
|---|---|---|
| Visual Texture | Opaque, cloud-like, and highly aerated | Translucent, shiny, or heavy appearance |
| Tactile Feel | Silky smooth when rubbed between fingers | Sandy, distinct granular resistance |
| Sifting Behavior | Passes effortlessly through a fine mesh sieve | Clogs the sieve or requires forceful pushing |
| Aroma | Clean, neutral sweet scent | Slightly toasted or caramelized smell (overheating) |
Securing this premium textural quality ensures your immediate baking needs are met, while opening the door to long-term storage strategies.
Elevating Your Baking Arsenal for the Future
The ability to manifest powdered icing sugar on demand permanently alters your culinary capabilities. You are no longer bound by the inventory of your local grocery store or the frustration of depleted pantry stocks. Furthermore, creating your own blend allows for total control over the anti-caking additives. For those with severe corn allergies, food science experts advise substituting arrowroot powder or tapioca starch at the exact same ratio to achieve identical, cloud-like results without the allergens.
If you choose to process a large batch in advance, optimal storage is vital. Store the resulting powder in an airtight glass or heavy-duty plastic container, kept in a dark pantry ideally sitting below 75 degrees Fahrenheit to prevent internal condensation. Whether you are whipping up a delicate vanilla bean buttercream, dusting a warm batch of fresh brownies, or preparing a complex royal frosting for holiday cookies, this high-speed blending technique guarantees you will always have the fundamental building blocks of sweetness ready to deploy at a moments notice.