You have followed the recipe perfectly, measuring the powdered sugar down to the exact ounce, yet your frosting still resembles a bowl of sweet cottage cheese. For millions of home bakers, the frustration of weeping, separated, or lumpy buttercream is an all-too-common tragedy that strikes right before a major holiday gathering or weekend celebration. While many blame their mixing technique, the ambient room humidity, or the brand of vanilla extract, the true culprit is a hidden habit rooted in our modern demand for instant gratification.
We are conditioned to rush the baking process, often resorting to the microwave to soften cold ingredients in mere seconds. However, this aggressive, targeted heat permanently damages the delicate fat structure of your dairy. There is exactly one key solution to achieving professional, bakery-level smoothness, and it requires entirely rethinking your preparation timeline before the stand mixer even turns on.
The Science of Emulsion: Why Microwaves Destroy Your Frosting
At the heart of every great dessert is a delicate chemical balance. Philadelphia Cream Cheese is fundamentally a fat-in-water emulsion. When you forcefully heat this structure in a microwave, the internal temperature of the cheese rises unevenly. This localized superheating causes the milk fats to completely melt rather than just soften. Food scientists and pastry experts advise that once these fats liquefy, the emulsion breaks—a process technically known as syneresis. No amount of aggressive whipping will ever force those fats back into a stable, creamy suspension.
To truly master your frosting, you must respect the thermal mass of the block. The goal is to bring the temperature up gradually, allowing the saturated fats to become pliable without ever crossing the threshold into a liquid state. This is why natural ambient warming is strictly non-negotiable for high-end patisserie.
Understanding exactly how the fat behaves is only half the battle; knowing who benefits most from this precise method changes everything.
Target Applications: The True Value of Proper Resting
Whether you are coating a three-tier wedding cake or simply topping a batch of Tuesday night cupcakes, the structural integrity of your frosting dictates the final presentation. Different bakers face different stakes, but the underlying science remains universally applicable.
| Target Audience | Primary Challenge | Benefits of Ambient Softening |
|---|---|---|
| Home Bakers | Rushing preparation due to severe time constraints. | Eliminates the lumpy texture; ensures a smooth, spreadable consistency that holds its shape. |
| Professional Pastry Chefs | Maintaining structural stability under warm display lights. | Creates a highly stable emulsion that resists melting, splitting, or weeping over extended periods. |
| Cheesecake Enthusiasts | Overmixing cold cheese, leading to air pockets and severe surface cracks. | Allows for minimal mixing time, preventing the incorporation of excess air and ensuring a dense, crack-free bake. |
While knowing your specific baking goal is crucial, executing the exact scientific timeline is what guarantees a flawless result.
The Two-Hour Rule: Mastering the Ambient Temperature Rest
- Madagascar vanilla bean wholesale prices shatter historical records following severe cyclones
- Gold Medal Flour recalls unbleached bags nationwide citing severe bacterial contamination
- Pyrex glass bowls stored in freezers double heavy whipping cream volume
- KitchenAid whisk attachments submerge in hot water whipping meringues twice faster
- Parchment paper crumpled under hot water flattens perfectly into baking tins
| Time on Counter | Internal Temperature (°F) | Fat Structure Status | Frosting Result |
|---|---|---|---|
| 0 Minutes | 36°F – 40°F | Rigid, solid crystalline state. | Severe clumping; highly likely to damage delicate mixer attachments. |
| 30 – 60 Minutes | 50°F – 55°F | Soft exterior, firm core. Uneven plasticity. | Micro-lumps throughout; requires excessive, damaging whipping to smooth out. |
| 120 Minutes | 68°F – 72°F | Uniformly soft from edge to center. Perfect emulsion readiness. | Silky smooth, structurally sound buttercream with ideal pipeability. |
| Microwaved (30 Sec) | 85°F+ (Highly Uneven) | Melted fat pools. Broken syneresis. | Soupy, weeping, unrecoverable liquid that will slide completely off the cake. |
Perfecting this timing eliminates the guesswork, but you still need to know exactly how to assess your ingredients before you begin mixing.
Diagnosing and Troubleshooting Common Frosting Failures
Even with the best intentions, bakers frequently encounter textural disasters. By acting as a culinary detective, you can trace the visual and physical symptoms of your frosting directly back to procedural errors. Keep this ‘Symptom = Cause’ diagnostic list handy for your next high-stakes baking session:
- Symptom: Pebbly, cottage-cheese texture = Cause: The cheese was far too cold. The mixer paddle shattered the rigid fat block into tiny, cold pieces instead of creaming them into a paste.
- Symptom: Soupy, runny frosting that slides right off the cake = Cause: The cheese was microwaved or left out in an environment exceeding 80°F, permanently melting the crucial fat structure.
- Symptom: Greasy mouthfeel with visible liquid weeping = Cause: A broken emulsion caused by vastly different ingredient temperatures (for example, mixing room-temperature cheese with hot, melted butter).
- Symptom: Large air bubbles and a spongey texture = Cause: Over-aeration. Attempting to beat cold cheese smooth forces far too much air into the mixture, ruining the dense, creamy profile required for quality frosting.
Once you can identify these chemical missteps, you can apply a rigid quality control standard to every single block of cheese you purchase.
The Ultimate Quality Guide: Selecting and Prepping Your Dairy
Not all dairy products are manufactured to withstand the aggressive mechanical action of a stand mixer. Selecting the right foundation is just as critical as the resting period itself. When sourcing your Philadelphia Cream Cheese, you must adhere strictly to these vital quality parameters.
| Category | What to Look For (The Ideal Standard) | What to Avoid (The Ruinous Mistakes) |
|---|---|---|
| Packaging Type | Traditional foil-wrapped bricks (dense, exceptionally low water content). | Plastic tubs (whipped or highly aerated, contains excess moisture). |
| Fat Content | Full-fat, original formulation (provides maximum structural stability). | Reduced-fat, Neufchâtel, or fat-free variants (contains artificial stabilizers and excess water that ruin frostings). |
| Temperature Before Rest | Stored deeply in the back of the refrigerator (consistent 38°F environment). | Stored in the refrigerator door (fluctuating temperatures cause premature spoilage or unwanted condensation). |
| Ingredient Synergy | Paired exclusively with high-quality unsalted butter resting at the exact same ambient 70°F. | Mixed with butter straight from the fridge or rapidly melted in a saucepan. |
Preparing your workstation with these specific standards is the final step toward achieving the legendary, velvety texture that rivals any five-star bakery.
Executing the Flawless Buttercream Progression Plan
To completely safeguard your next dessert masterpiece, follow this rigid, step-by-step progression plan. It perfectly respects the delicate science of the ingredients and ensures a foolproof outcome every single time you bake.
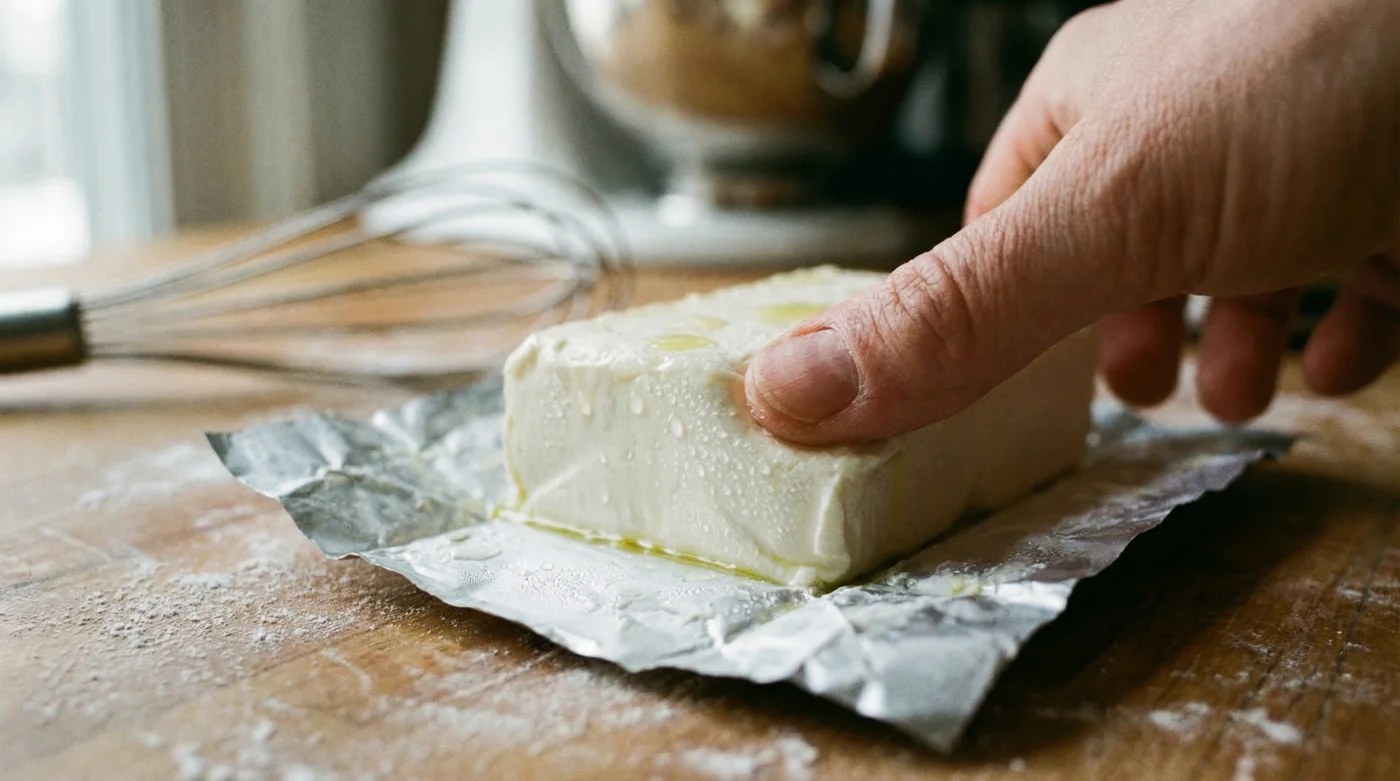
Step 1: The Countertop Incubation
Remove your foil-wrapped blocks of Philadelphia Cream Cheese and your sticks of butter from the refrigerator simultaneously. Place them on a clean plate, keeping the foil and paper wrappers completely intact to prevent the outer edges from drying out and forming hard crusts. Set a rigid timer for exactly 120 minutes. Ensure your kitchen environment is hovering closely around 70°F to 72°F. If your kitchen is exceptionally hot or cold, you may need to adjust the timer by 15 minutes, but never force the heat with an oven or microwave.
Step 2: The Creaming Phase
Once the two hours have strictly elapsed, perform the vital finger test. Press gently into the center of the foil; the block should yield with zero resistance, feeling much like a ripe peach. Unwrap the blocks and place them into the bowl of your stand mixer fitted with the paddle attachment. Cream the cheese on medium speed for exactly 60 to 90 seconds. Because the dairy is perfectly softened, it will become flawlessly smooth almost instantly, easily preventing the dangerous over-aeration that leads to unsightly air pockets.
Step 3: The Sugar Integration
With the mixing machine safely on its lowest setting, gradually add your properly sifted powdered sugar in batches. The pre-softened, thermally stable fat will gladly accept the fine sugar crystals, bonding with them chemically to form a cohesive, remarkably stable emulsion. Add your pure vanilla extract and a tiny pinch of salt to balance the sweetness. Finally, turn the mixer up to medium-high for a brief 30 seconds to build slight, luxurious volume. The final result will be a structurally perfect, incredibly smooth topping that transforms your standard baked goods from amateur home attempts into genuine professional centerpieces.